Guides6 min readFloorGen team
How to Read a Floor Plan: Dimensions, Scale and Symbols
How to read a floor plan: dimension strings, centreline vs finished sizes, scale, north arrow, room labels and areas, and door and window schedules.
To read a floor plan, imagine the house sliced horizontally about 4 ft above the floor and viewed from above. Find the north arrow and the scale first, then read room names and sizes, then follow the dimension strings around the outside, remembering that they usually measure to wall centrelines or framing, not to the finished wall surfaces you would measure with a tape. Doors, windows and fixtures are shown by symbols, and their sizes are often in schedules.
This guide reads one real plan from top to bottom: a 1,500 ft² three-bedroom starter house, 50 × 30 ft outside.
Start with orientation: north arrow and title block
Before reading any number, find the north arrow, usually in a corner of the sheet, and turn the plan in your head so north points where it does on the site. That tells you which rooms get morning sun and which face the street. Then read the title block, the box along the bottom or right edge: it names the project, the sheet, the scale, the date and the revision. Two copies of the "same" plan with different revision letters are not the same plan.
Check the scale
The scale says how many feet of building one inch of paper represents. US residential plans are usually drawn at 1/4" = 1'-0" (1:48), with 1/8" = 1'-0" (1:96) for larger houses and site plans. Look for the written scale near the drawing title and for a graphic scale bar. Trust the bar over the words if the sheet has been reduced or enlarged: a plan printed on letter paper from a larger original is no longer at the scale written on it, but the bar shrank with it. Floor plan scale explains scales and sheet sizes in more depth.
Read the example plan
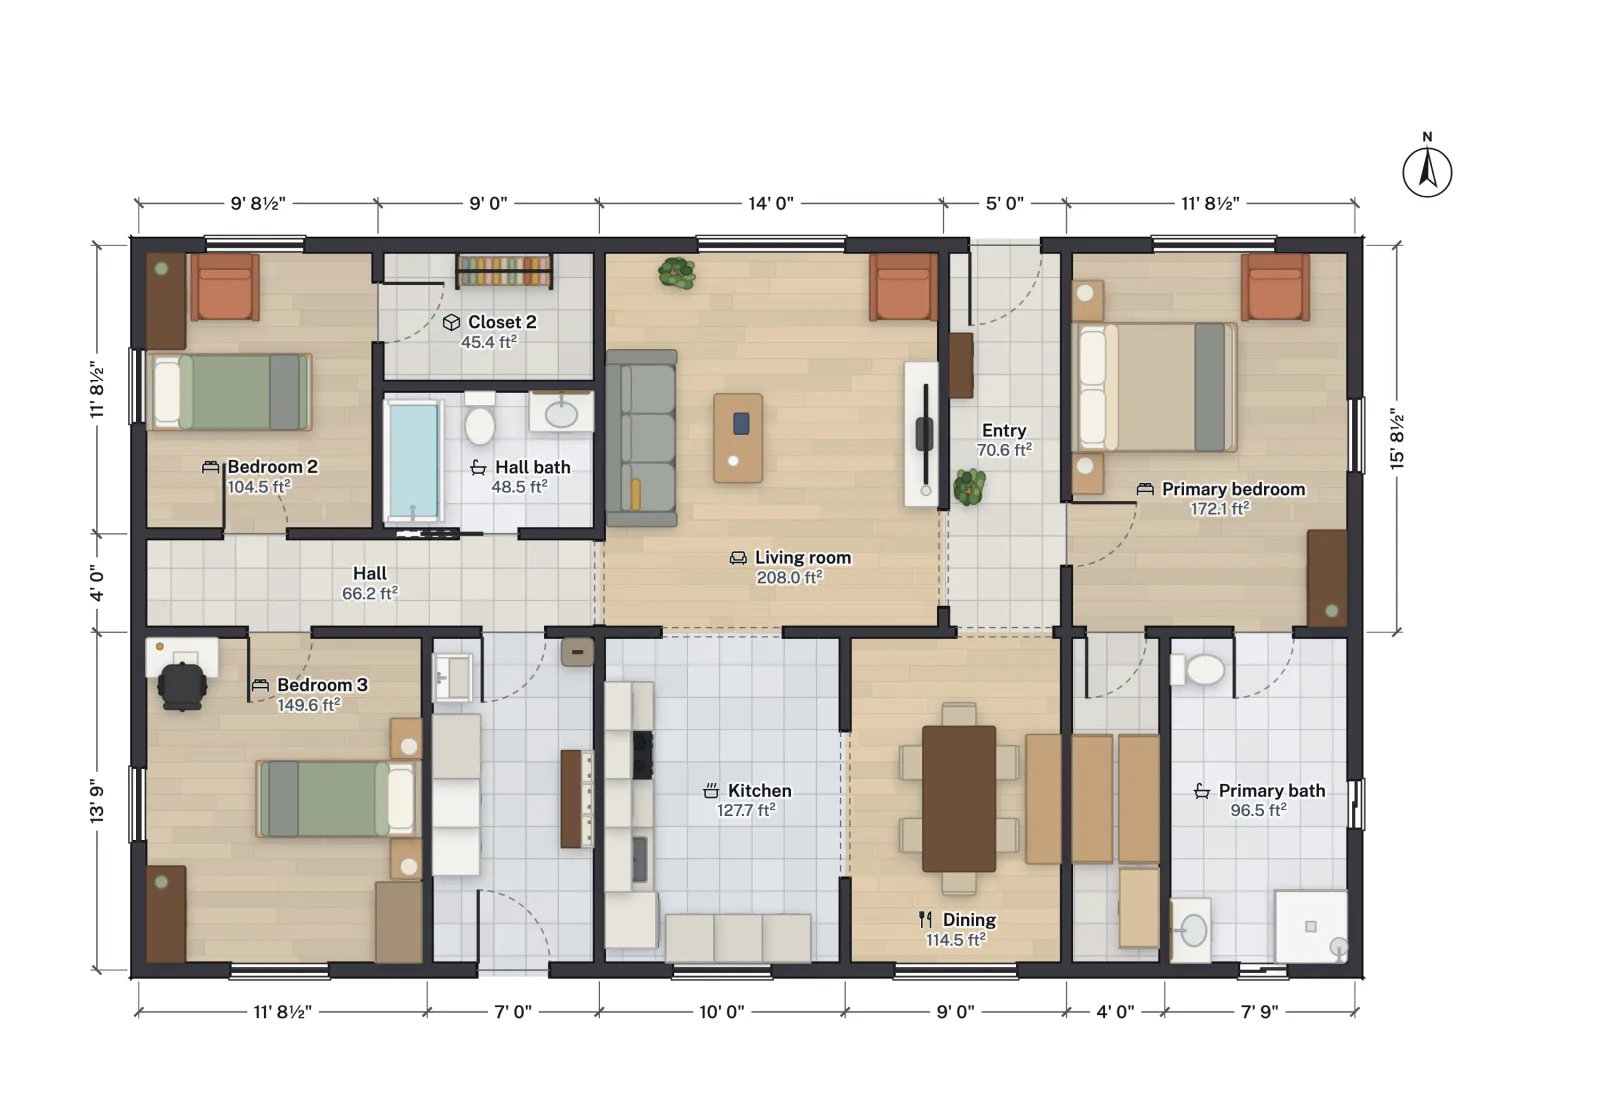
The front door opens into an entry between the living room and the primary suite. The living room flows into the kitchen and dining area through openings drawn as dashed lines. A hall on the west side leads to two bedrooms and the hall bath. The primary bedroom on the east side has its own bath in the southeast corner. North is up, per the arrow in the top right.
How to read a floor plan's dimension strings
Dimension strings are the rows of numbers outside the walls, with tick marks or arrows where each measurement starts and ends. The row closest to the building usually locates every wall or opening along that side; a row farther out, where a plan has one, gives the overall length. Inside the plan, shorter strings locate interior walls.
The key question is what each string measures to. US construction drawings commonly dimension to one of three references:
| Reference | What it means | Common on |
|---|---|---|
| Wall centreline | The middle of each wall | Design plans, software output, many builder plans |
| Face of stud / framing | The edge of the framing, before drywall | Framing plans; what the carpenter lays out |
| Finished face | Drywall to drywall, the clear room size | Remodels, cabinet and furniture plans |
You can see the difference on the example plan. Add up the strings down the left side: 11' 8½" + 4' 0" + 13' 9" = 29' 5½". The house is 30 ft 0 in deep outside. The 6½ in that is missing is one wall thickness, half a wall at each end, because the strings run from centreline to centreline. The bottom row does the same thing across the 50 ft front: 11' 8½" + 7' 0" + 10' 0" + 9' 0" + 4' 0" + 7' 9" = 49' 5½".
So a bedroom whose walls are dimensioned 12 ft apart on centres is not 12 ft wide inside. Subtract half of each wall: with 4½ in interior walls, a 12 ft centreline room is about 11 ft 7½ in clear. If you are ordering a rug or built-in, measure the real room.
Room labels and areas
Each room carries a name and often an area. On this plan, the areas are net: the floor inside the room's walls. The living room is 208 ft², the primary bedroom 172.1 ft², Bedroom 3 149.6 ft², Bedroom 2 104.5 ft² and the kitchen 127.7 ft². Some plans print room sizes instead, such as "12'-0" × 13'-6"", which are usually width by depth as seen on the sheet.
The headline square footage is different again. This template is 1,500 ft² measured to the outside faces of its walls, the kind of figure a listing normally quotes. Inside the outer walls it is 1,414.5 ft², and the room areas themselves add up to 1,339.3 ft², because interior walls take up floor too.
| Measured to | Area | Used for |
|---|---|---|
| Outside faces of the exterior walls | 1,500 ft² | Listings and appraisals (finished, above-grade area) |
| Inside faces of the exterior walls | 1,414.5 ft² | Rarely quoted; useful for comparison |
| Sum of the rooms (net) | 1,339.3 ft² | Flooring and paint estimates |
The US standard for measuring a house for sale is ANSI Z765, which measures to the exterior finished surface; how to calculate square footage walks through it.
Doors, windows and schedules
Doors and windows are shown by symbols: a door swing arc, a window break in the wall. Their sizes are either written next to them or tagged with a mark such as D1 or W3 that points to a schedule, a table elsewhere on the sheet listing each type's size, style, sill height and count. When you see a tag, look it up rather than guessing from the drawing. Floor plan symbols covers the shapes and abbreviations.
Other schedules you may meet are a room finish schedule (floor, wall and ceiling materials per room), an appliance schedule and a fixture schedule. On permit sets, notes may also point to sections and details on other sheets, using a circle split in two: the top number is the detail, the bottom the sheet it is on.
Reading the plan in 3D
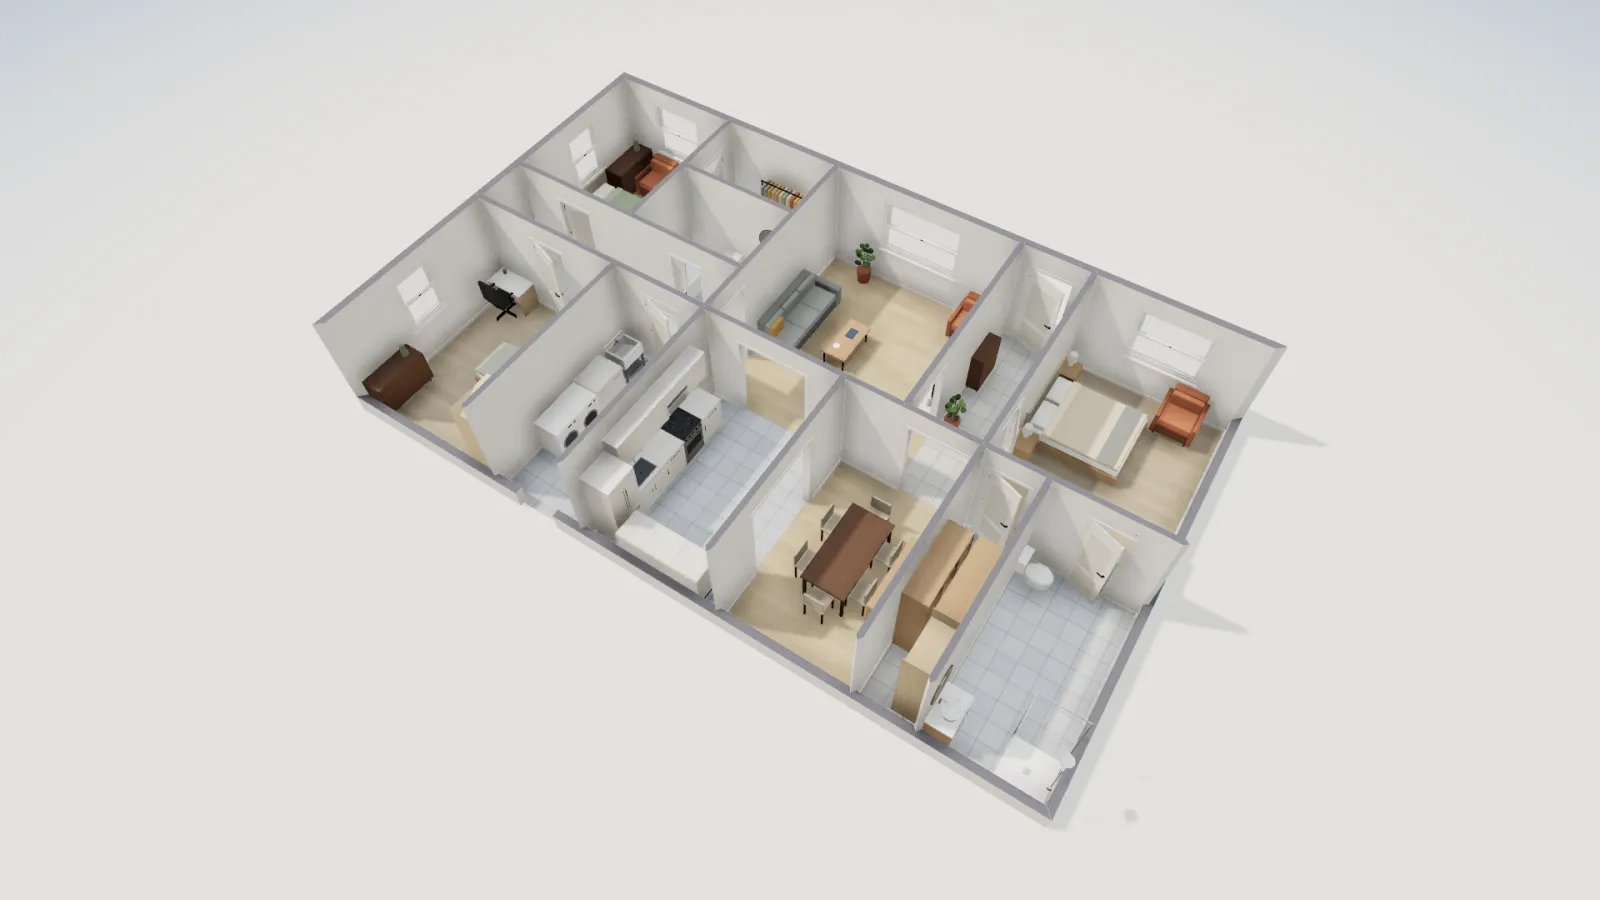
If you struggle to picture a plan, look at the same house in 3D. Every symbol becomes an object, and it is obvious which way the doors swing and how big the rooms feel.
A checklist for reading any floor plan
- Find the north arrow and the title block; note the date and revision.
- Read the scale, and find the scale bar.
- Walk through the plan from the front door, naming each room.
- Read the room sizes or areas, and check which area they are.
- Follow the dimension strings and work out what they measure to (add a row and compare it with the overall size).
- Look up each door and window tag in its schedule.
- Read the general notes; they often say "dimensions to face of stud unless noted" or similar.
Try it on a plan you can click
In FloorGen you can click any room to see its net area, any wall or opening to see its size, and switch the dimension strings between Centre, Inside and Outside with the Measure to setting, which makes the centreline-versus-finished difference easy to see. The door and window schedule lists every opening with its tag, size and count. To make a plan of your own, see how to draw a floor plan.
More from the blog
Guides8 min read
How to Draw a Floor Plan: A Step-by-Step Guide (2026)
Guides7 min read
Floor Plan Symbols and Abbreviations: A Visual Guide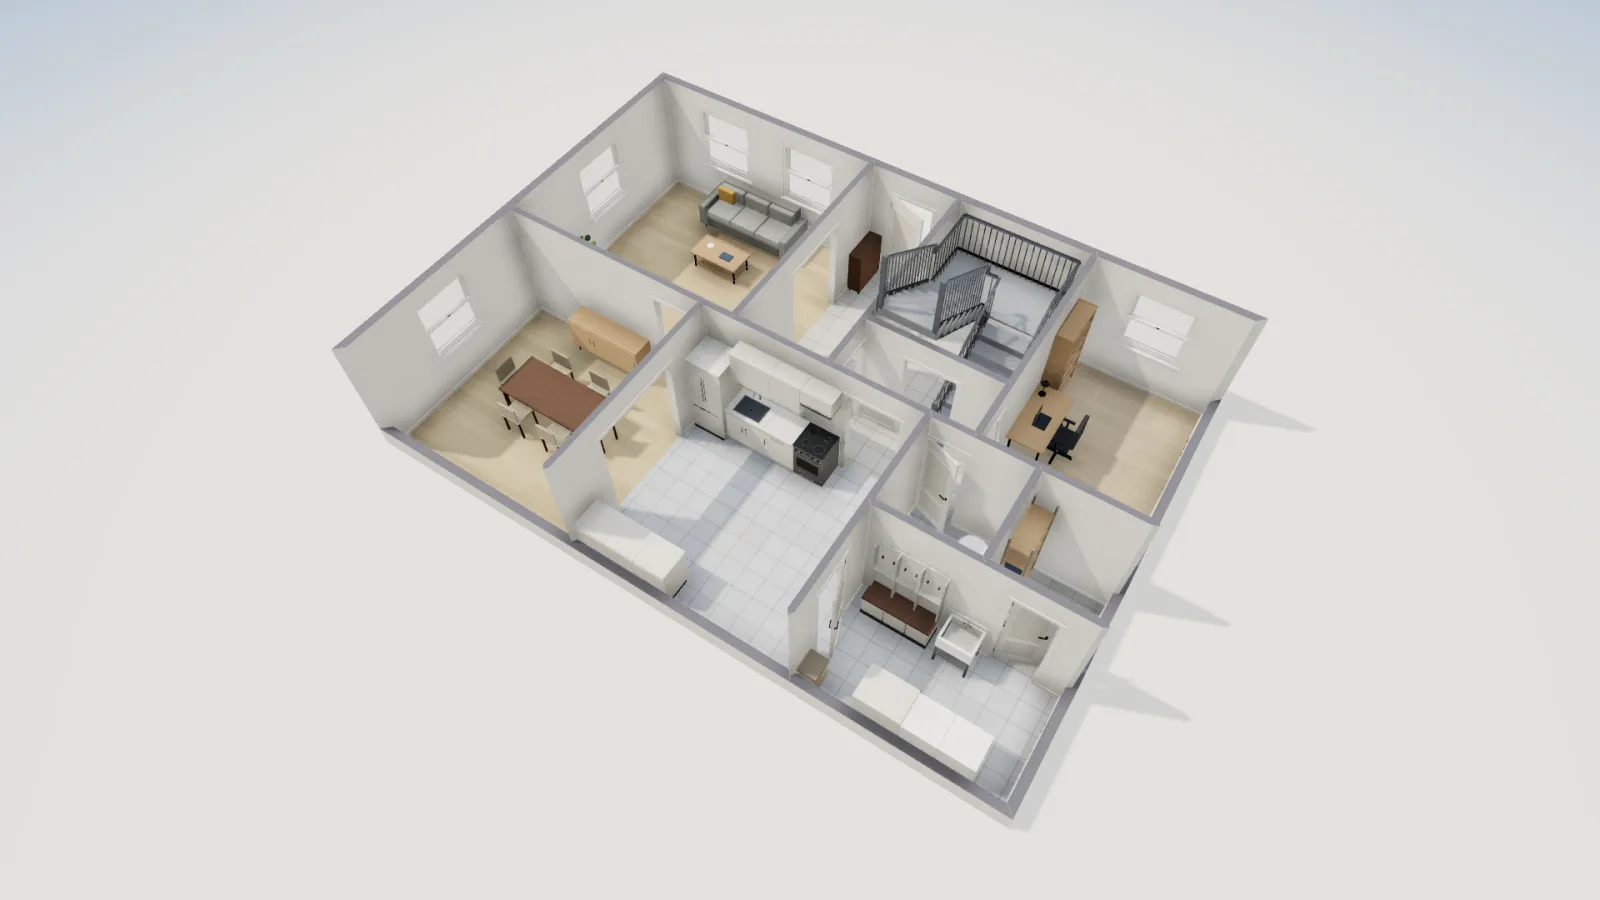
Guides6 min read
Floor Plan Scale: 1/4" = 1'-0", 1:50 and Paper Sizes