Guides8 min readFloorGen team
How to Draw a Floor Plan: A Step-by-Step Guide (2026)
How to draw a floor plan to scale: measure, set the scale, draw walls, add doors, windows and dimensions, then check it. By hand or free in your browser.
To draw a floor plan, measure every room and wall, pick a scale (1/4" = 1'-0" is the usual one for a house), draw the outside walls at their real thickness, then the inside walls, doors and windows. Finish with dimension strings, room names and a check against your measurements. You can do it with graph paper and a ruler or with free software that does the scaling for you; the steps are the same.
This guide goes through each step on a single 12 × 12 ft bedroom, which is small enough to follow line by line, then shows how the same steps work in FloorGen, a free browser-based floor plan editor.
What a floor plan has to show
A floor plan is a horizontal cut through the building, conventionally about 4 ft above the floor, looked at from above. Everything below the cut is drawn: walls, doors, windows, stairs, fixtures and often furniture. A useful plan has:
- Walls at their real thickness, with outside walls usually heavier than inside ones.
- Doors and windows in the right place, with door swings drawn.
- Dimension strings so anyone can read off a size without a ruler.
- Room names, and often each room's area.
- A scale and a north arrow, so the drawing can be measured and oriented.
If you are not sure what the lines and abbreviations mean, read floor plan symbols first, and how to read a floor plan for dimension strings and scale.
Step 1: measure the space
Everything else depends on this. Sketch each room by eye, then measure each wall corner to corner above the baseboard, using running measurements from one corner to every door and window edge. Measure wall thickness at a doorway, both diagonals of each room to see whether it is square, and the ceiling height. How to measure a room for a floor plan covers this step in detail, with a worked example.
For a whole house, also measure the outside of the building. The outside perimeter is the best check you have: the inside room sizes plus the wall thicknesses should add up to it, give or take an inch. If the house may already have drawings, see how to get a floor plan of your house before you start from scratch.
Step 2: choose a scale and a sheet
On paper, the scale decides how big the drawing is. At 1/4" = 1'-0", each foot of house is a quarter inch on paper, so a 12 ft wall is 3 in long. At 1/8" = 1'-0" it is 1½ in. Pick the largest scale at which the whole floor fits on your sheet with room around it for dimensions.
| Building or room | At 1/2" = 1'-0" | At 1/4" = 1'-0" | At 1/8" = 1'-0" |
|---|---|---|---|
| 12 × 14 ft bedroom | 6 × 7 in | 3 × 3½ in | 1½ × 1¾ in |
| 40 × 20 ft ADU | 20 × 10 in | 10 × 5 in | 5 × 2½ in |
| 50 × 30 ft house | 25 × 15 in | 12½ × 7½ in | 6¼ × 3¾ in |
| 70 × 36 ft ranch with garage | 35 × 18 in | 17½ × 9 in | 8¾ × 4½ in |
On graph paper with four squares to the inch, one square equals one foot at 1/4" scale, which is why that combination is the classic homeowner method. In software you draw at full size and choose the scale only when you print. Floor plan scale explains the common scales and sheet sizes.
Step 3: draw the outside walls
Start with the outside walls, because every inside wall is placed from them. Draw the outer face first, then a parallel line inside it at the wall thickness. As a rule of thumb, a 2×6 exterior wall with sheathing and drywall is about 6½ in thick and a 2×4 interior wall about 4½ in. At 1/4" scale, 6½ in is just over 1/8 in on paper, so a fine pencil matters.
Check the outside rectangle against your exterior measurements before going further. A plan that is 3 in short overall here will be 3 in short in every room later.
Step 4: draw the inside walls
Place each interior wall by measuring from an outside wall, using your room sizes plus the wall thicknesses. Work across the house in one direction, so errors show up at the far wall instead of hiding in the middle. Draw closets as their own small rooms: a reach-in closet is commonly about 2 ft deep inside, and a walk-in closet needs about 5 ft or more for hanging on one side and a path.
Step 5: add doors and windows
Doors are drawn as a gap in the wall with a line for the door leaf and a quarter-circle arc for its swing. Windows are a break in the wall with thin lines for the glass and sill. Place each by its distance from a corner, using your running measurements. Note the door width on the plan, or tag each door and window (D1, W1…) and list them in a schedule.
Common interior doors are 28, 30 and 32 in wide, and exterior entry doors usually 36 in, though older houses often have odd sizes, so measure rather than assume. Draw the swing the right way: a door that swings into a bed or across a closet door is the kind of problem a floor plan exists to catch.
Step 6: add stairs, fixtures and furniture
Draw stairs with their treads, an arrow marked UP or DN, and a break line where the cut passes through them. Add the fixed items next: the toilet, tub or shower, sinks, kitchen counters and appliances, the water heater and the furnace. Furniture is optional on a construction plan but useful on a layout plan; draw it at real size so the plan tells the truth about what fits.
Step 7: dimension and label
Dimension strings run outside the building in rows: one row locating every wall and opening along a side, and an overall row beyond it. On US construction drawings, interior walls are usually dimensioned to their centrelines or to the stud face; say which you used. Inside each room, write its name and, if you like, its area.
Finish with a north arrow, the scale in words (for example "1/4" = 1'-0"") and a graphic scale bar. The bar stays correct if someone prints the sheet at a different size; the written scale does not.
Step 8: check it
- Add up each row of dimensions and compare it with the overall dimension. They must match.
- Compare the drawn room sizes with the sizes you measured with a tape, inside face to inside face.
- Walk through the plan in your head: every door opens fully, every room can be reached, every bedroom has a window.
- If the plan is for a permit, check room sizes, ceiling heights and bedroom escape windows against your local code. Most US jurisdictions use the IRC, which sets a minimum of 70 ft² and 7 ft in any horizontal direction for habitable rooms other than kitchens (2021 IRC R304 / 2024 IRC R312). Local amendments vary.
The example: a 12 × 12 ft bedroom
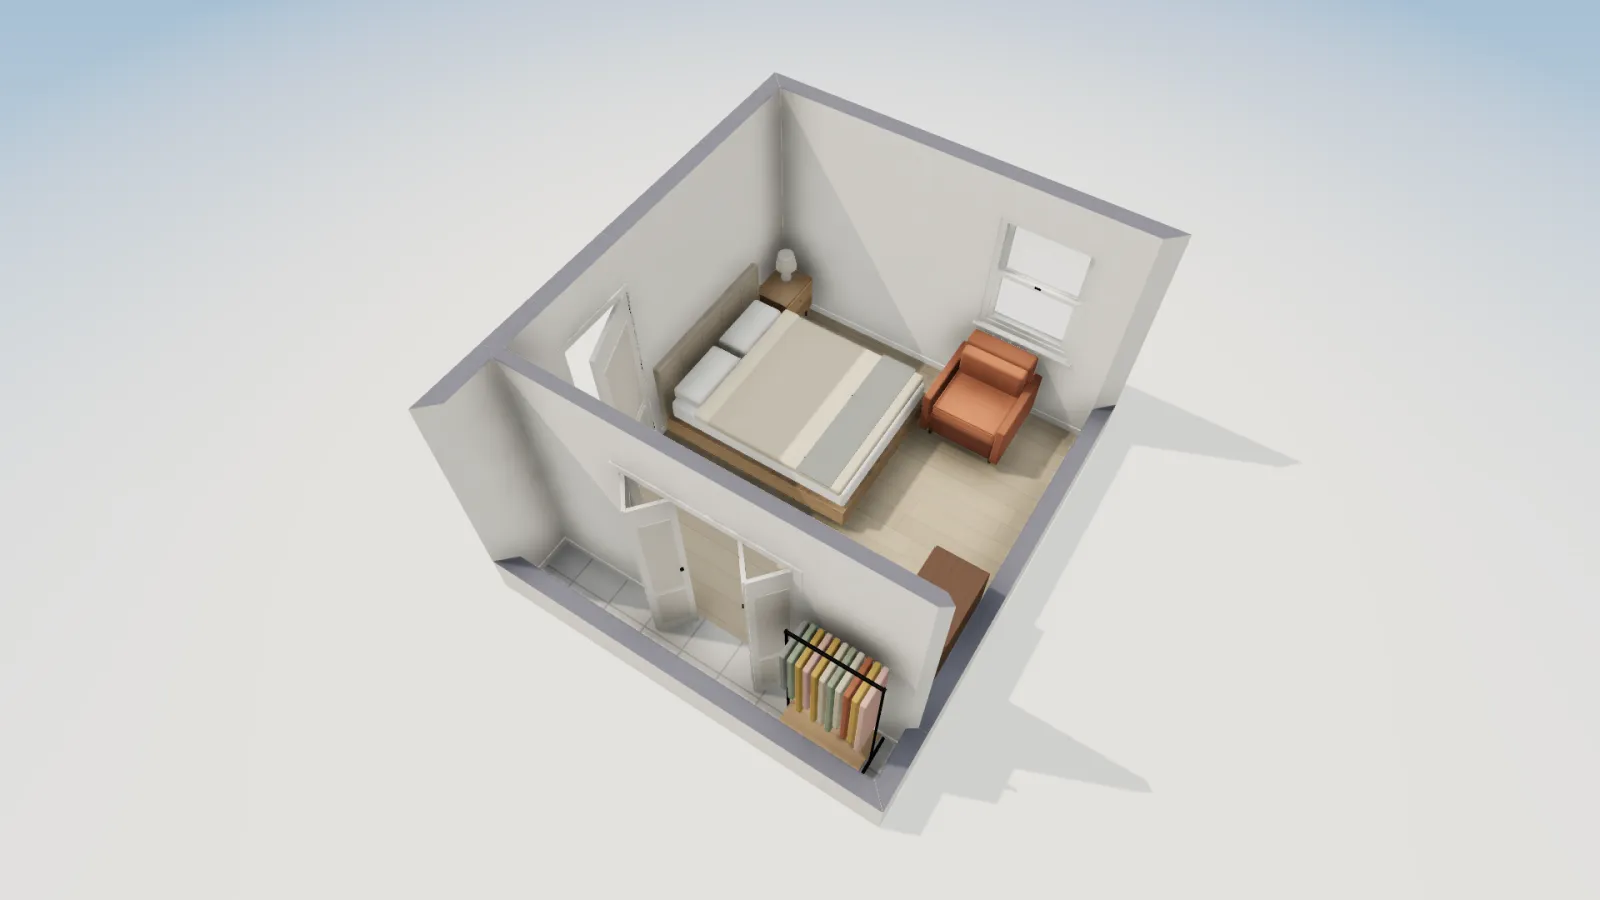
Here is the result of those steps for one room, exported from FloorGen. The bedroom is 12 × 12 ft on its wall centrelines, with a 2 ft deep reach-in closet along the south side, a 32 in door on the west wall, a 36 in window on each of the two outside walls, and a 60 in bifold door on the closet. The room label reads 132.2 ft², the floor area to the inside faces of the walls; the closet adds 17.7 ft² of its own.
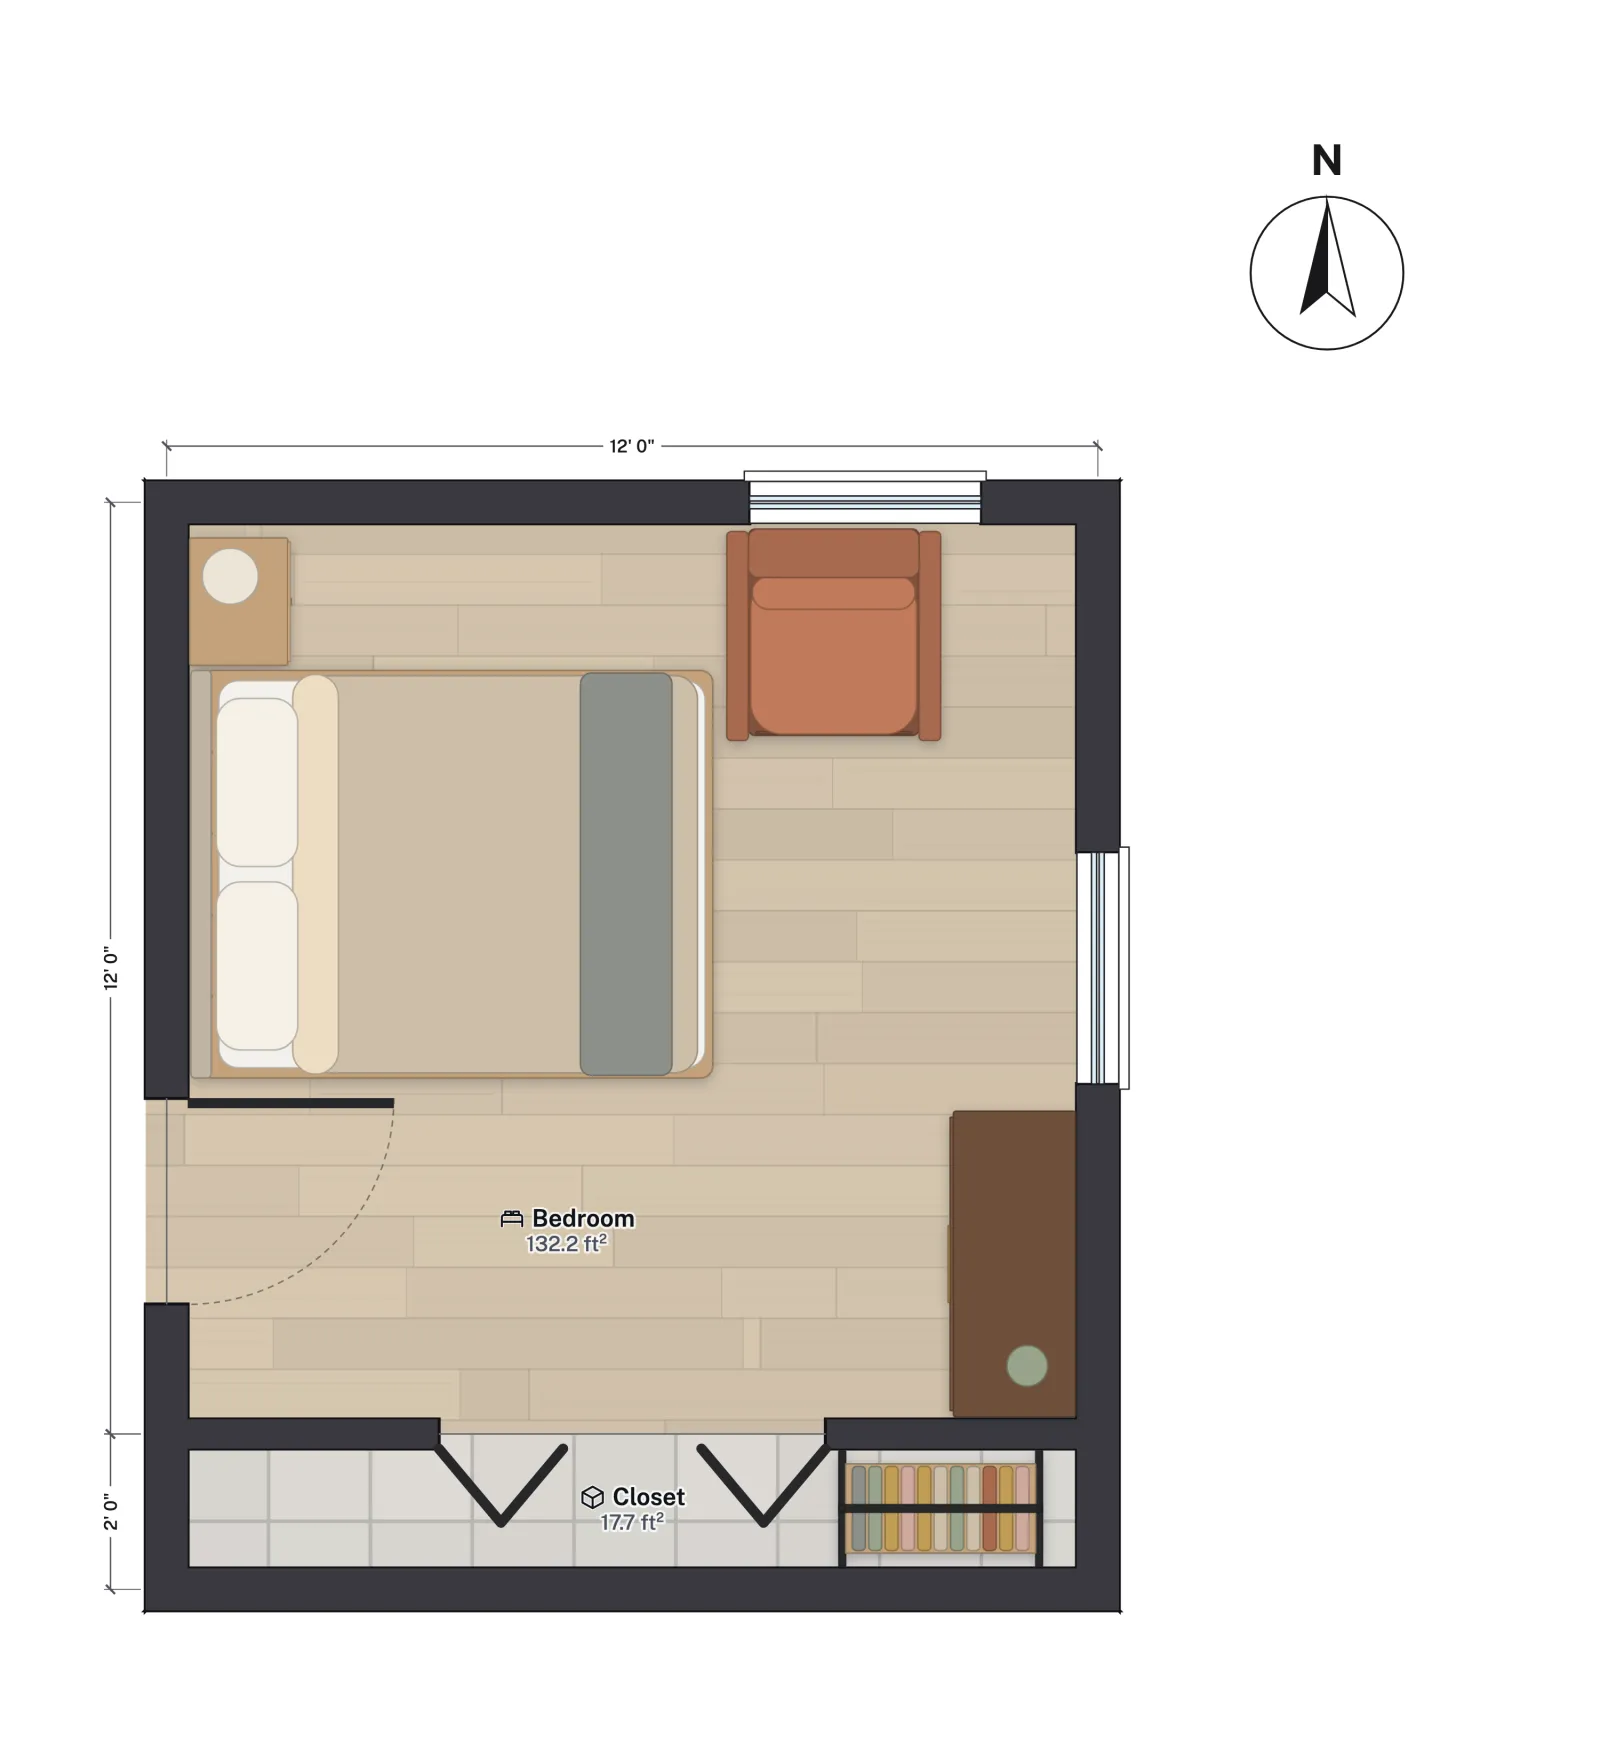
Notice the details from the steps above. The dimension strings sit outside the walls and run to centrelines (12' 0" and 2' 0"). The door's arc shows it swings into the room against the wall, clear of the bed. The closet's bifold door shows its panels folding in a zigzag. The north arrow sits in the corner of the sheet.
How to draw a floor plan in FloorGen
FloorGen is free, runs in the browser and works without an account; your project is saved in the browser as you go, and signing in later moves it to the cloud. The steps map onto its tools like this:
- Units and walls. Choose United States as the region and the project works in feet and inches, with new outside walls 6½ in thick and inside walls 4½ in. Change them under Wall thickness if your walls differ.
- Draw. Drag a rectangle with the room tool, or draw walls corner by corner. While drawing, type a length such as
11' 6"and press Enter; Tab switches to the angle, and Shift keeps a wall straight. Walls snap to the grid and to 15° angle steps unless you change them in settings or hold Alt. - Trace instead of drawing. If you have an old plan, photo or PDF, Trace an image puts it under the drawing, Set image scale fixes its scale from two points a known distance apart, and Detect walls can propose walls from its thick dark lines. Converting a floor plan image to an editable plan covers it step by step.
- Doors and windows. Click on a wall to place one, pick a size from Common widths, and use Flip hinge side and Flip swing to match the real door. Windows have a Sill height. Every door and window appears in the door and window schedule with a D1 or W1 tag.
- Dimensions. Wall dimensions are drawn automatically. The Measure to switch shows them to the centrelines, the inside faces or the outside faces. The Tape measure checks any distance, and Dimension that follows walls adds a dimension that updates when the walls move.
- Rooms and checks. Give each room a type. With the building code set to IRC (US), the Review panel flags rooms under the minimum size, stairs with steep risers or short treads, and bedrooms without an escape window, among other checks.
- Print. Export → Print set makes a PDF with a sheet per floor at a real scale, a title block, a north arrow and a graphic scale bar. Auto picks the largest standard scale that fits the paper you choose.
By hand or with software?
Drawing by hand teaches you the most about your house, and for one room it is quick. For a whole floor, free floor plan software wins on three counts: you draw at full size and never convert to scale, a moved wall moves its dimensions with it, and areas are computed instead of added up by hand, which also makes estimating drywall and flooring from the plan quick. Either way, the measuring is the part that decides whether the plan is right.
More from the blog
Guides8 min read
How to Measure a Room for a Floor Plan (Step by Step)
Guides6 min read
Standard Window Sizes: Size Codes, Rough Openings and Egress
Guides6 min read
Free Floor Plan Software and Apps Compared (2026)