Guides6 min readVinit Kumar
How to Add Dimensions to a Floor Plan: Strings and Rules
How to add dimensions to a floor plan: the three dimension strings, centreline vs inside vs outside, writing feet and inches, and auto-dimensioning a real plan.
To add dimensions to a floor plan, draw rows of measurements, called dimension strings, outside each side of the building: an overall dimension farthest out, a string locating every wall and opening closer in, and room sizes inside where they help. Decide first what each string measures to (wall centrelines, stud faces or finished faces), say so on the sheet, and make every string add up to the overall dimension beside it.
This guide is about putting dimensions on a plan. Reading someone else's is covered in how to read a floor plan, and measuring the rooms in the first place in how to measure a room. The example is FloorGen's 1,500 ft² starter house, 50 × 30 ft outside.
The three dimension strings
US construction drawings usually dimension each side of the building in tiers, working outward from the wall. Not every plan needs all three, but the order is the same:
| String | Where | What it gives |
|---|---|---|
| Openings and walls | Nearest the building | The position of every window, door and interior wall along that side |
| Walls or offsets | Next out | Jogs in the outside wall and the main interior walls, without the openings |
| Overall | Farthest out | The total length of that side, which the strings inside it must add up to |
A common rule of thumb is about 1/2 in on the printed sheet from the building to the first string and about 3/8 in between strings; office standards vary, so the point is even spacing, with the first string clear of window symbols and notes. Interior dimensions go inside the building, usually as one string across a row of rooms rather than a separate number in each.
Choose what you measure to
The same wall can be dimensioned three ways, and the difference is a few inches per wall. How to read a floor plan explains how a reader tells them apart; when you are the one drawing, pick one for interior walls and stick to it:
- Centreline. Convenient while you design: a room drawn 12 ft on centres stays 12 ft when you change a wall's thickness.
- Face of stud. Convenient on site: it is where the framer hooks the tape, and many residential offices dimension the outside walls to the face of stud or sheathing too.
- Finished face. Use it where a clear size matters (cabinets, built-ins, hall and bath clearances), and mark it, as in "36" CLR" for the open space between finished surfaces.
Write the choice on the plan in a general note ("interior dimensions to centreline of wall unless noted") so nobody has to guess. Drafting courses traditionally teach locating doors and windows in wood-frame walls to the centre of the opening and masonry openings to their edges, but many offices dimension rough-opening edges instead; again, say which in the notes.
Write the numbers clearly
- Feet and inches with a dash: 12'-6", 3'-0". Write the zero inches; under a foot, some offices write 0'-8" and others just 8". Pick one and keep to it.
- Fractions to 1/2 in, occasionally 1/4 in, on a house plan. Smaller fractions ask for an accuracy site framing will not hold.
- Text on top of the line, readable from the bottom or the right of the sheet (the aligned system architectural drawings use). Nobody should have to read a number upside down.
- Ticks or dots, usually, rather than arrows: architectural plans mostly mark each end with a short slash or a dot, while arrowheads are more common on engineering drawings. Whichever you use, use it everywhere, with extension lines that stop just short of the wall.
- Make every string add up. The pieces must total the overall. Many drafters deliberately leave the least critical piece unwritten (an open string) so site tolerances have somewhere to go, or write EQ for spaces that only need to be equal.
- Never dimension the same thing twice. Two numbers for one length will one day disagree.
A dimensioned plan, step by step
The plan below has two tiers on the top and left sides and one on the others. The inner strings, which FloorGen draws by itself, run along the wall centrelines and locate each wall that meets the outside wall. The blue overall dimensions, about 5 ft outside the walls, were added with FloorGen's automatic dimensions, which measure the overall width and depth to the outside faces of the walls.
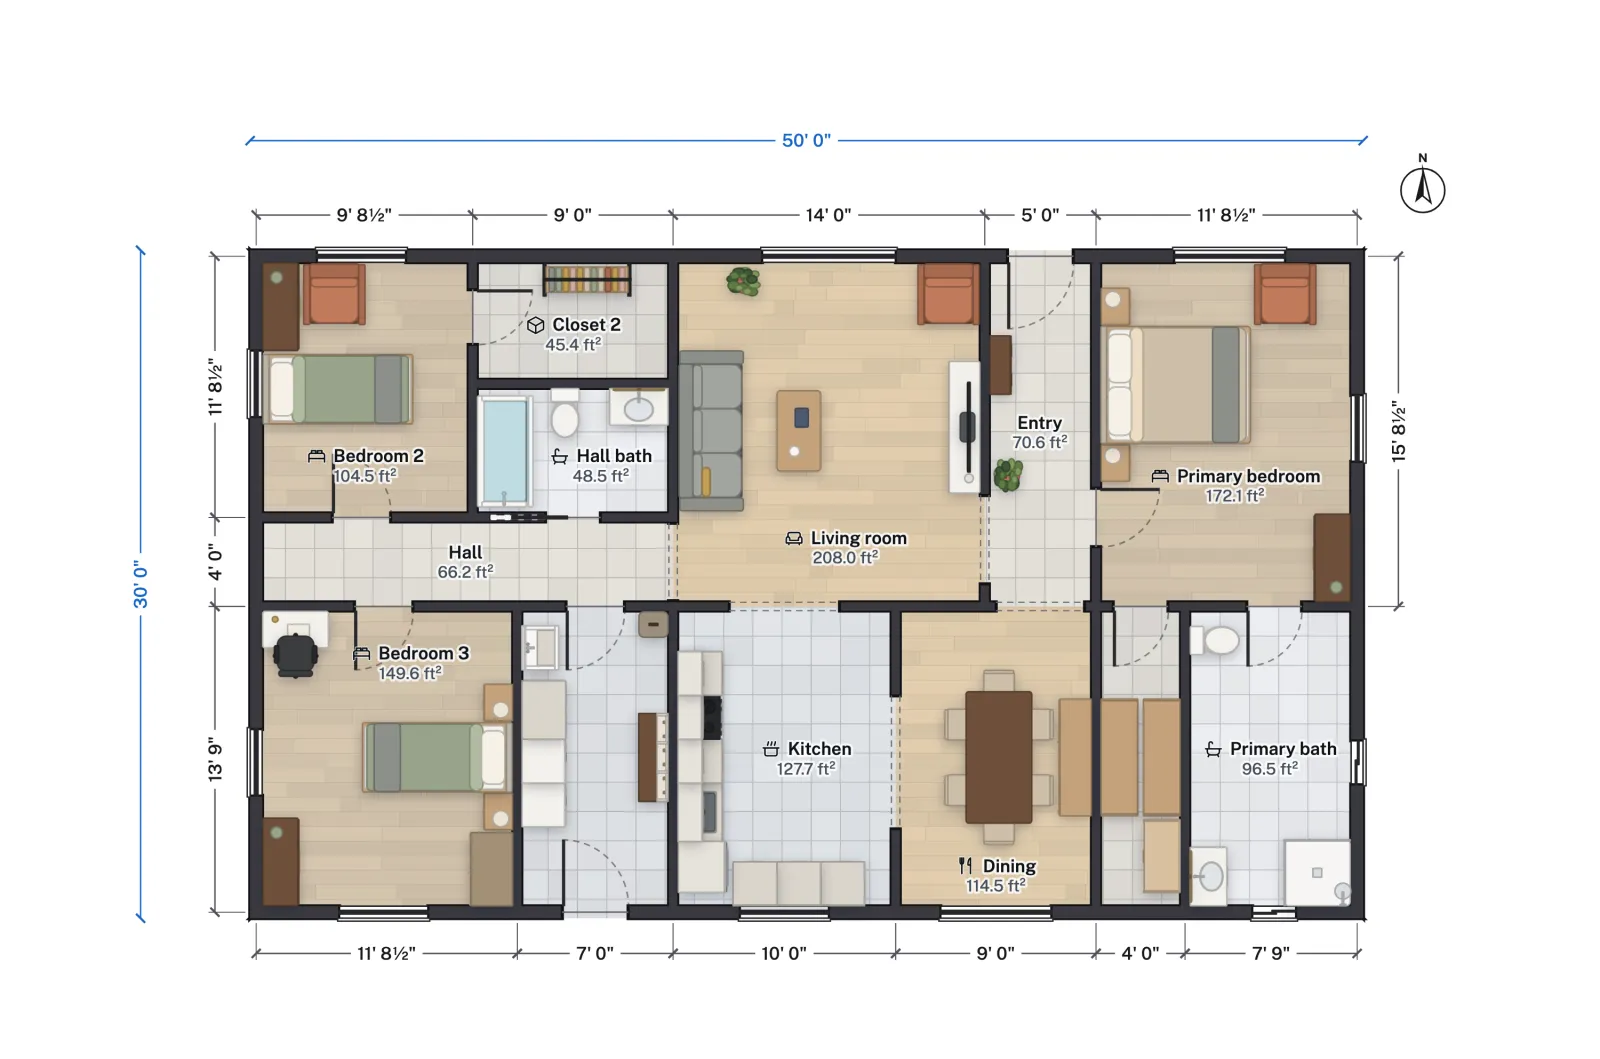
Check the top side. The centreline string reads 9'-8½", 9'-0", 14'-0", 5'-0" and 11'-8½" (FloorGen prints them with a space, 9' 8½", rather than a dash), which adds up to 49'-5" as displayed. The exact centreline length is 49'-5½" (FloorGen rounds each piece to the nearest half inch), and half of the 6½ in outside wall at each end brings it to the 50'-0" overall. That is the "close the string" check in practice: when the pieces and the overall disagree by more than the wall thicknesses and rounding explain, something was drawn or typed wrong.
The same plan states its areas the other way round, net, inside the walls: the living room is 208.0 ft², the primary bedroom 172.1 ft², the kitchen 127.7 ft² and bedroom 3 149.6 ft². The house is 1,500 ft² to the outside faces, 1,414.5 ft² inside the outer walls, and its rooms add up to 1,339.3 ft².
How to add dimensions in FloorGen
FloorGen draws to full size, so its dimensions are measured from the model rather than typed, and they change when a wall moves. There are four ways to get them on a plan:
| Tool | How | What it does |
|---|---|---|
| Wall dimensions | View options › Wall dimensions | Each wall's length, drawn for you and on by default. Measure to (account menu › Project details › Dimensions and measurements) switches them between Centre, Inside (clear sizes) and Outside (overall sizes). |
| Dimension | Shift+M, then click a wall or a piece of furniture, then a second one | A dimension attached to both. It re-measures whenever they move; dragging an end or the whole dimension cuts it loose, as Detach does. |
| Tape and Pin | M, click two points, then P to pin | A quick measurement that snaps to corners, wall faces and furniture. Pinned, it stays on the plan; Attach to walls and furniture makes it follow them. Press Enter to chain on from the end; a pinned chain becomes one measurement per piece. |
| Automatic dimensions | Ask FloorGen AI, or an agent with the macros toolset (auto_dimension) | Adds the overall width and depth outside the walls (60 cm, about 2 ft, out by default) and, if asked, the width and depth of each rectangular room, skipping any already there. There is no editor button for it. |
Pinned measurements and dimensions show on the exported 2D plan, as in the picture above. For paper, Export → Print set puts each floor on a sheet at a standard scale such as 1/4" = 1'-0" (floor plan scale explains how it picks one). Lengths follow the project's units, so the whole plan switches between feet and inches and metric at once; one dimension cannot be in feet while the rest are metric.
Common dimensioning mistakes
- Mixed references. Some walls to centreline, others to the face, with no note. Every string then looks wrong by a few inches.
- Strings that do not close. Usually a missing piece or a rounding slip; add them up before you print.
- Dimensions inside the rooms that clutter the plan. Put them outside where you can, and inside only where a clear size matters (a hall width, a closet depth, a kitchen aisle).
- Scaled sizes. A dimension written as measured off a printed plan carries the printer's error; draw at full size, or measure the real building.
- No overall. Without it nobody can check the strings, and the foundation crew has nothing to set out from.
For a permit set, reviewers usually want overall dimensions, room sizes and the locations of walls and openings; drawing plans for a building permit lists the rest of what goes on the sheet, and floor plan abbreviations the shorthand such as CLR, EQ and TYP that dimensions use.
More from the blog
Guides6 min read
How to Read a Floor Plan: Dimensions, Scale and Symbols
Guides8 min read
How to Draw a Floor Plan: A Step-by-Step Guide (2026)Guides7 min read
Average House Size in the US and Canada (2026 Data)