The 3D view
Updated 10 min readWorks without an account
Press 3 to see your plan as a 3D model. Turn around it, open it up as a dollhouse, light it by the sun and put a roof on it. Every change you make on the plan shows up in 3D straight away.
Open the 3D view
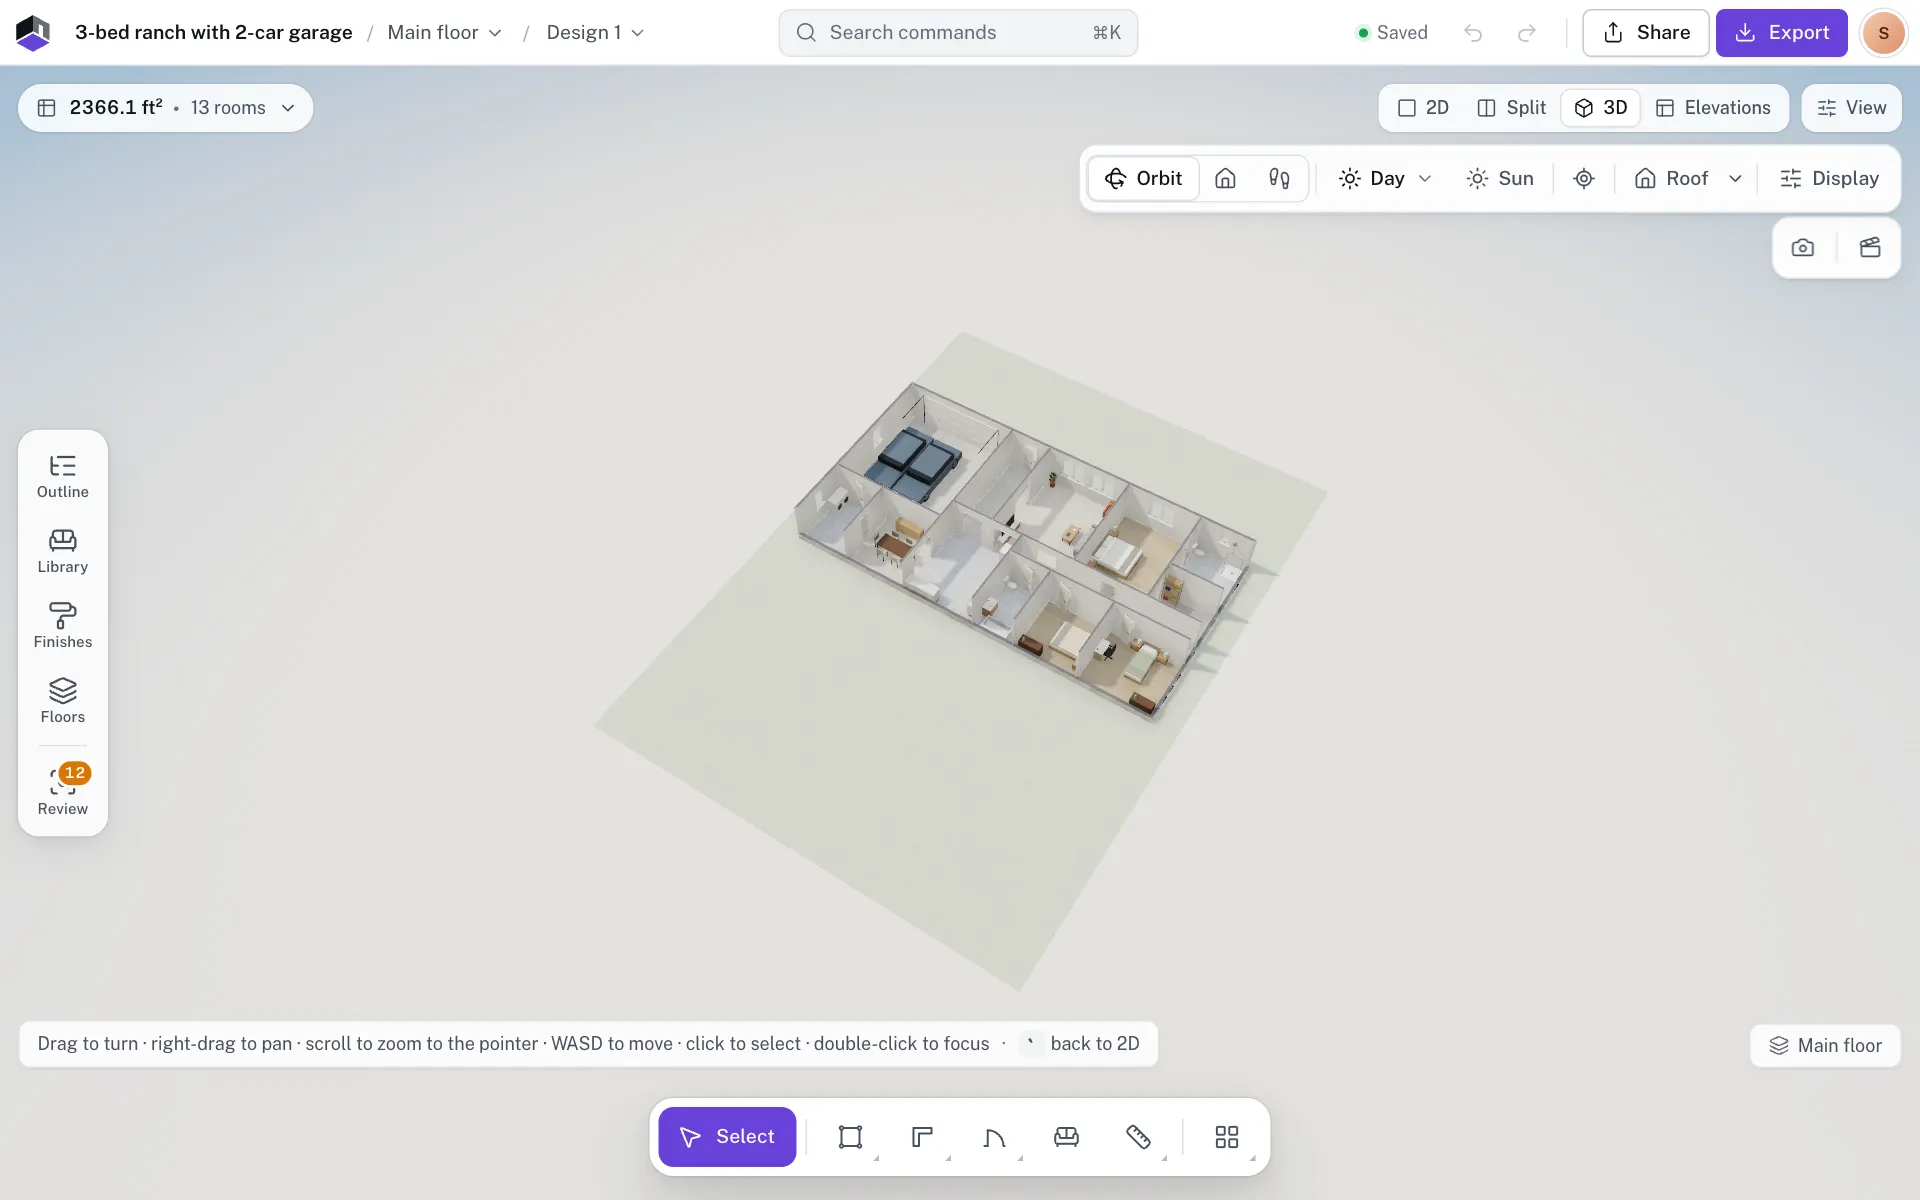
- Step 1: Switch to 3D
Press 3, or click 3D in the view switch at the top right. Split shows the plan and the 3D view side by side, and ` steps through 2D, Split and 3D.
- Step 2: Pick a camera
Orbit turns around the model. Dollhouse looks in from above with the upper storeys cut away. Walk puts you inside at eye height. The view opens in Orbit.
- Step 3: Choose the lighting
The lighting menu shows the current choice. Pick Day, Evening or Night. The view starts in Day.
- Step 4: Light it by the sun
Click Sun to set the time of day, the month, the city and which way north lies. See Light the plan by the sun.
- Step 5: Add a roof
The roof starts hidden. In Orbit, click Roof to show it over the top floor. The arrow beside it opens Roof settings. See The roof.
- Step 6: Set the display
Open Display for Show floors below, the Quality and the Renderer. See Quality and renderer.
Lengths show in the project’s units, except the roof overhang, which is always in cm, and the floor spread, which is always in metres.
The 3D bar
| Control | What it does | Shown | Default |
|---|---|---|---|
| Camera | Orbit, Dollhouse or Walk. On a narrow screen it becomes a menu. | Always | Orbit |
| Lighting | Day, Evening or Night. Picking one turns the sun off. | Always | Day |
| Sun | Opens the sun and compass panel. | Always | Off |
| Reset view | Puts the camera back to its starting view. Same as Home. | Orbit and Dollhouse | |
| Walk settings | Speed, eye height, lens, mouse and screen. See Walk through your plan. | Walk | |
| Roof and Roof settings | Shows the roof, and sets its shape, pitch, overhang and finish. | Orbit | Hidden |
| Explode | Spreads the storeys apart, 0 to 4.0 m in 10 cm steps. The gap shows on the button when it is above 0. | Dollhouse, with Whole building on | 0 m |
| Whole building | Shows every storey. Off, it shows only the open floor. | More than one floor | Off |
| Display | Show floors below, Quality and Renderer. | Always |
The bar under the camera controls holds your saved camera views and the clapperboard for a walkthrough video. See Camera views and tours and Make a walkthrough video. This browser remembers Roof, Explode, Whole building, Quality and Renderer.
Move around the model
| To | Do this |
|---|---|
| Turn the view | Drag. It turns about the point you press on. |
| Pan | Right-drag, middle-drag or hold Space and drag |
| Zoom towards the pointer | Scroll, or pinch on a trackpad |
| Zoom in or out | + and -, on the main keys or the number pad |
| Pan with the keyboard | W A S D or the arrow keys; hold ⇧ to go faster |
| Turn left or right | Q and E |
| Focus on an object | Double-click it |
| Reset the view | Home, or click Reset view |
Click an object to select it, the same as on the plan. The line at the bottom left lists the controls for the current camera and how to go back to 2D (`). It hides on a narrow panel. The chip at the bottom right names the floor shown.
In Orbit, with the roof hidden and Whole building off, the outside walls nearest you drop away when you look down at the plan from 30° or more above the horizon, so you can see into the rooms. With the roof on, they stay.
Move and turn furniture in 3D
Click a piece of furniture in Orbit or Dollhouse to show its handles. Locked and hidden items get none, and none show while you walk. Each drag is one undo step. With the item selected, Del deletes it, R turns it 90° (⇧R the other way) and ⌘D duplicates it, as on the plan. These keys work in the 3D view on its own; in Split view the plan takes them.
| Handle | What it does | Steps |
|---|---|---|
| The item itself | Drag it over the floor. It snaps like on the plan: to the grid, to walls and in line with other items. It climbs onto an item that can carry it, and comes down again. | Grid snap; hold ⌥ for none |
| The arrow | Raises or lowers the item. The floor and the tops of items under it catch it, and its top stays below the ceiling. | 1 cm; hold ⌥ for 0.1 cm with no catching |
| The ring | Turns the item about its centre. | 15°; hold ⌥ to turn freely |
See every floor
- Whole building shows every storey. It appears once the project has more than one floor, and starts off.
- With Whole building off, you see the open floor. Show floors below in Display greys the floors under it. It starts on.
- In Dollhouse with Whole building on, Explode opens Explode floors, a slider from 0 to 4.0 m that spreads the storeys apart so you can look into each one.
The roof
In Orbit, Roof shows a roof over the top floor; click it again to hide it. The arrow beside it opens Roof settings. The roof is saved with the project, so the elevations and their PDFs draw the same roof. Whether the 3D view shows it is a setting of this browser.
| Field | What it does | Range | Default |
|---|---|---|---|
| Roof shape | Flat follows the outline of the top floor, with a low parapet. Gable has two slopes and a triangle of wall at each end. Hip slopes on all four sides at the same pitch. | Flat, Gable, Hip | Flat |
| Pitch | The slope of a gable or hip roof, in degrees. It and the building’s width set the ridge height. | 10° to 60°, in 1° steps | 30° |
| Overhang | How far the eaves run out past the walls on every side. They drop on the same slope. | 0 to 120 cm, in 5 cm steps | 40 cm |
| Finish | The roof covering, in 3D and in the elevations. | Asphalt shingles, Clay tiles, Slate, Metal, Membrane | Membrane |
Pitch and Overhang show only for Gable and Hip; a flat roof has only Finish. A gable or hip ridge runs along the longer side of the top floor. When the top floor is not a rectangle, a pitched roof covers its bounding box, and the panel says so.
How tall the roof is
There is no height field. The eaves sit on the tallest wall of the top floor, and the ridge rises above them by half the building’s width across the ridge times the tangent of the pitch. So Pitch and the building’s width set the ridge height. At 30°, a house 8 m wide gets a ridge 2.3 m above the wall tops. For storey and wall heights, see Heights and levels.
| Slope (rise in 12) | Pitch |
|---|---|
| 4:12 | 18.4° |
| 6:12 | 26.6° |
| 8:12 | 33.7° |
| 12:12 | 45° |
The slider moves in whole degrees, so pick the nearest one, such as 27° for 6:12. Three US templates carry an exact 6:12 roof, which reads 26.6°: the 3-bed ranch with 2-car garage, the 3-bed ranch with finished basement and the 4-bed two-story.
Light the plan by the sun
Click Sun to open the sun and compass panel. Move the Time of day slider or pick a Month to light the plan by the sun. Back to Day / Evening / Night returns to the lighting presets.
| Field | What it does | Range | Default |
|---|---|---|---|
| North on the plan | A dial: drag the needle to point it at north. It snaps to 5°; hold ⇧ for any angle. With the dial focused, the arrow keys turn it 5°, or 1° with ⇧. | Full circle | Plan top |
| North angle field | The same angle in degrees, clockwise from the top of the plan. | -360° to 360° | 0° |
| Time of day | The hour in local solar time. | 6:00 to 20:00, in 15-minute steps | 4 pm |
| Month | The time of year. | January to December | This month |
| City | Sets the latitude from a list of 20 cities (18 in the US, Toronto and London), or Custom latitude to type your own. | 20 cities or Custom latitude | Custom latitude |
| Latitude | Shown with Custom latitude. | -66° to 66°, in 0.1° steps | 39° |
- While the sun is on, the panel says where it is, such as 32° above the horizon, in the SW, or The sun is below the horizon.
- The north angle and the location are saved with the project. Each turn of the dial is one undo step. The angle also turns the north arrow on the plan and in the print set, and decides which side is the north elevation.
- The hour and the month last for this session only and are not saved with the project. Times are local solar time.
Quality and renderer
| Choice | What it does | Default |
|---|---|---|
| Show floors below | Greys the floors under the open one. Shown with more than one floor and Whole building off. | On |
| Quality: Auto | Turns the effects on when the device has more than 4 processor cores and the view shows at most 2 floors and 400 items. Past that, it turns them off to save memory, and the tip says so. | Yes |
| Quality: High | Soft shadows in corners and under furniture, glowing lamps at night, and sharper sun shadows. Slower on older devices. | |
| Quality: Fast | No ambient occlusion or glow, and lighter shadows. Best on older devices. | |
| Renderer | Auto uses WebGPU when the browser has it. WebGL has every effect. WebGPU is experimental, without ambient occlusion, glow or contact shadows yet, and falls back to WebGL when the browser lacks it. | WebGL |
While you walk, the quality changes only the detail of the shadows.
Split view
- Split puts the plan on the left and the 3D view on the right. Draw on the plan and watch the model change.
- Drag the divider between the panes to share the width, from 25% to 75% each side. Double-click it to go back to half and half. With the divider focused, the left and right arrow keys move it 5% and Home centres it. This browser remembers where it is.
- The 3D / Elevation switch at the top left of the right pane chooses what Split shows beside the plan: the 3D model or the open elevation. It starts on 3D, and Right pane in View options sets the same thing.
On a phone or tablet
Drag to orbit and pinch to zoom. On a narrow screen the camera choices become a menu, like Lighting. Split is not offered on a phone.
Questions
How do I make the roof taller?
Raise Pitch in Roof settings; there is no height field. The ridge rises half the building’s width times the tangent of the pitch, so a wider building gets a taller roof at the same pitch. To lift the whole roof, raise the top floor’s walls or a storey below it. A flat roof has no slope to change. See Heights and levels.
Why does my pitched roof cover a rectangle?
When the top floor is not rectangular, a gable or hip roof covers its bounding box. A flat roof follows the outline.
Is the roof saved with the project?
Its shape, pitch, overhang and finish are, so the elevations draw the same roof. They are project settings, so Undo does not step back through them. Whether the 3D view shows the roof is a setting of this browser, and it starts off.
Why are some outside walls missing?
In Orbit with the roof hidden, the near outside walls drop away while you look down into the plan. Turn on Roof, Whole building, or lower the camera to see them.
The 3D view is slow. What can I do?
Open Display and pick Fast. It turns off ambient occlusion and glow and keeps light shadows.
What does Building 3D mean?
The first time you open the 3D view, it builds the model in three steps: Walls and floors, Doors and windows, then Furniture. On a big plan, a card shows how far it has got.
Can I save a picture of the 3D view?
Yes, with a free account. See Export a 3D image.