Draw a room
Updated 7 min readWorks without an account
Any closed loop of walls becomes a room with its name and area. Drag a room in one move with the Room tool, type its size, or click corner to corner when the shape is not a rectangle.
Draw a room
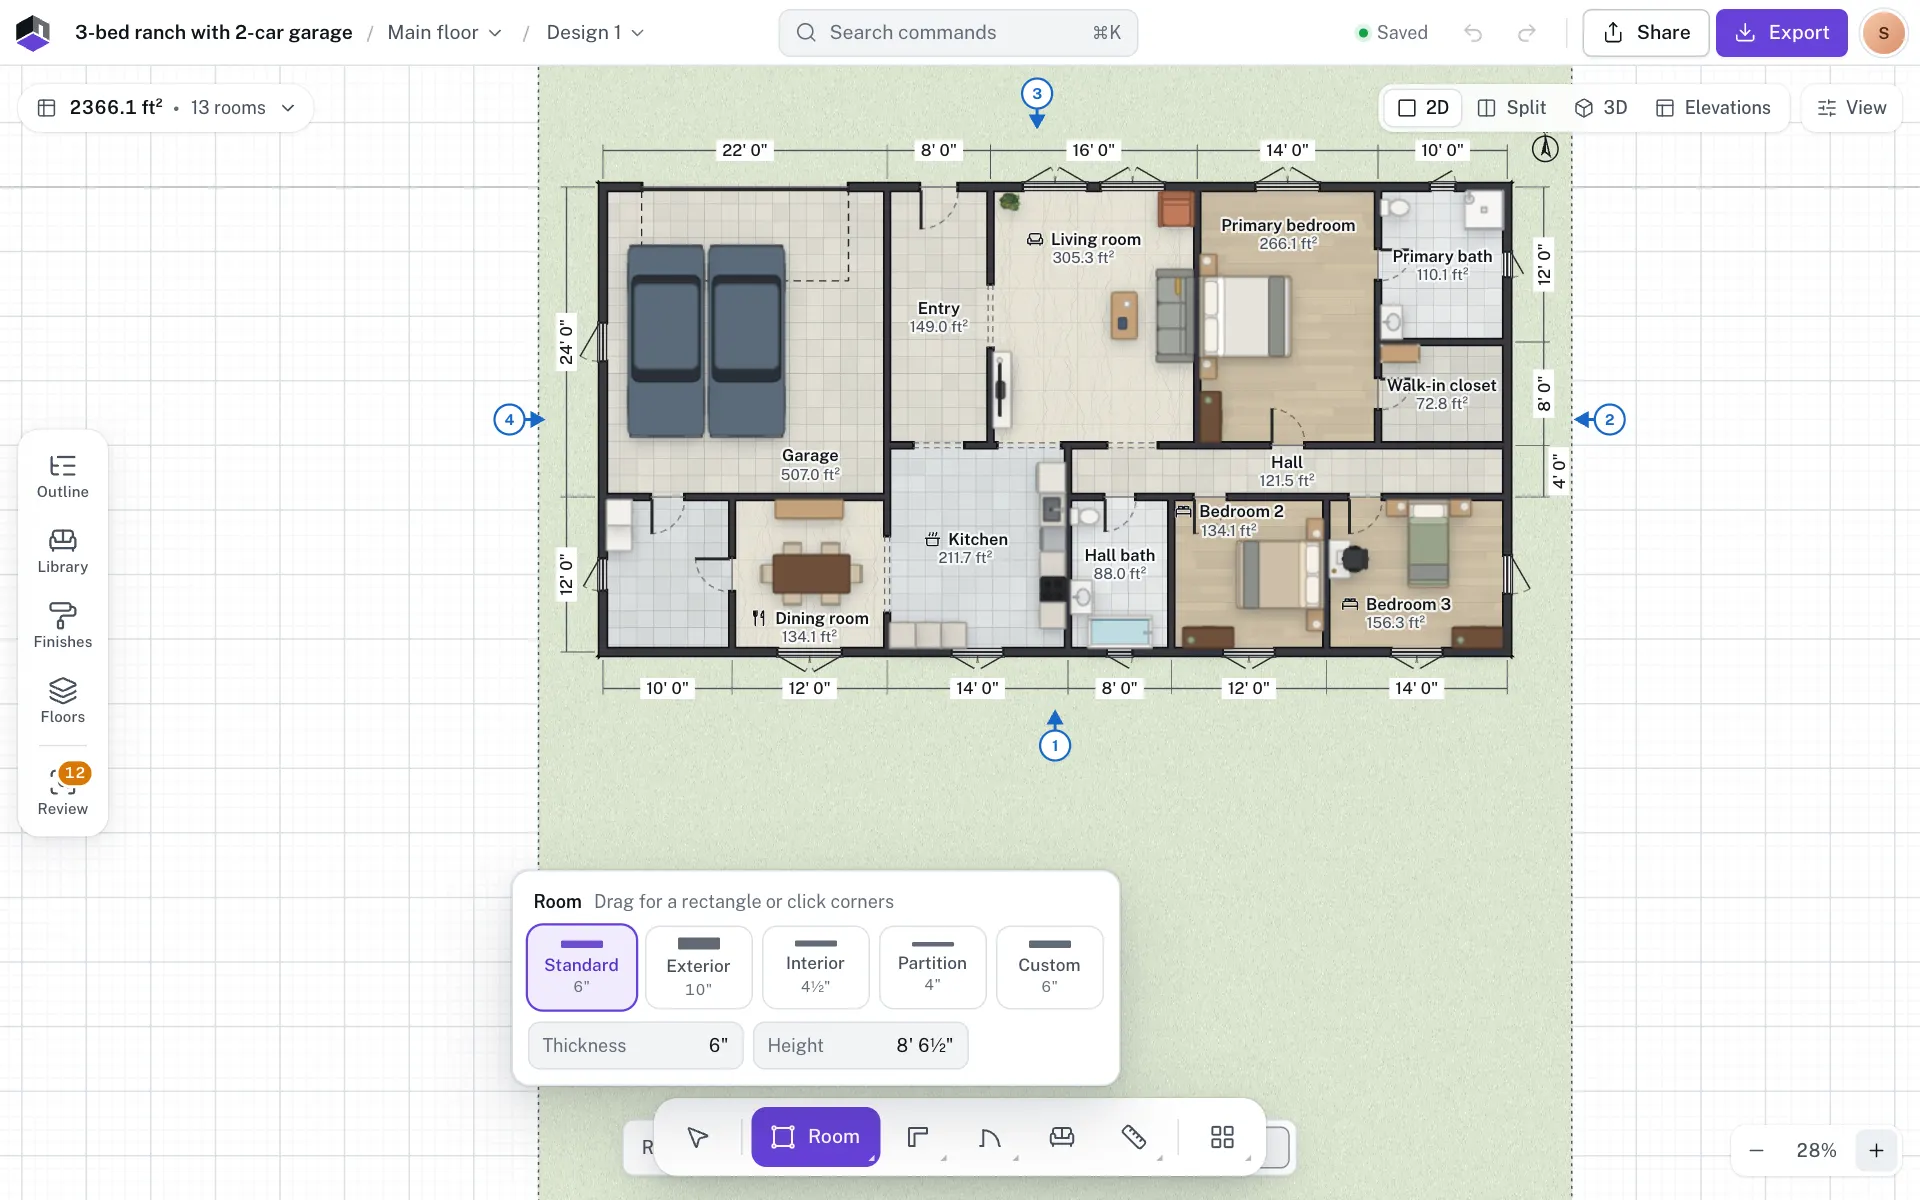
- Step 1: Pick the Room tool
Press R, or click Room in the tool dock at the bottom of the screen.
- Step 2: Choose a thickness preset
The tool card reads Drag for a rectangle or click corners. Pick Standard, Exterior, Interior, Partition or Custom, and change Thickness and Height if you need to. See Thickness presets.
- Step 3: Drag from corner to corner
Press where one corner goes and release at the opposite one. Hold ⌥ to draw without snapping. For an L or a bay, click each corner instead.
- Step 4: For other shapes, draw walls
Press W and click corner to corner. Type a length with the number keys, press Tab for the angle and ↵ to place the wall. Hold ⇧ to keep a wall straight; Backspace removes the last corner.
- Step 5: Check the room
The new room is named Room 1, Room 2 and so on, and shows its area. A room drawn with the Room tool is selected, and the Select tool comes back so you can edit it at once. The chip at the top left adds up every room, for example 2366.1 ft² · 13 rooms.
A new room shares any wall it has in common with its neighbours, so walls never double up. Lengths show in the project’s units.
Click the corners
With the Room tool, click each corner in turn. Corners snap like walls do, in 15° steps from the last corner, and Backspace removes the last one. To close the room, click the first corner again, click the last corner a second time (a double-click), press ↵ or right-click. Closed after only two corners, it makes a rectangle with them as opposite corners.
Type a room size
- Step 6: Open the Room size box
With the Room tool on, the Room size box sits at the bottom of the plan. Typing a digit jumps to it.
- Step 7: Type the width and length
Type them with a comma between, such as
4, 3.5,420cm, 3mor13', 11'. Anxor×works too. Each side can be up to 100 m. - Step 8: Choose what the size measures
The Centre, Inside and Outside switch beside the box is the project’s Measure to setting. Inside makes the typed size the clear room size; Outside makes it the overall size.
- Step 9: Press Enter
Press ↵. The room starts at the corner you clicked first, or sits in the middle of the view when you clicked none.
When a room is refused
- A rectangle under 75 cm on a side is refused: Rooms need to be at least 75 cm across.
- Drawing over a room that is there already says There's already a room there.
- A room can’t cross a door or window: Walls can't cross a door or window.
- A closed loop under 0.5 m², measured to the wall centres, is not a room. It shows a red badge such as Too small to be a room (0.42 m²).
Change a room
Click inside a room to select it. Its card has the name, Room type, Floor finish and Area with an On plan switch. All properties (↵) has every field below.
| Field | What it does | Range | Default |
|---|---|---|---|
| Room name | The name on the plan. Type it on the card or in All properties and press ↵. Rename… on the pill or the right-click menu jumps to it. It can’t be left empty. | Up to 60 characters | Room 1, Room 2…, the lowest number not in use |
| Room type | Suggests a name and a floor finish (see the next table). The review checks use it, for example for ceiling heights. | The list below | Not set |
| Floor finish (card), Floor (All properties) | The floor’s finish and Colour. See Finishes and wall paint. | Plain | |
| Floor area and Perimeter | Read-only. The area is net, inside the walls; the hint under it gives the area to the wall centres. | ||
| On plan (card), Show area on plan (All properties) | Shows or hides the area under the room name on the plan. | On or off | On |
| Height from the floor (Level) | Sinks the room (negative) or raises it (positive). See Heights and levels. | −90 to 300 cm | 0 |
| Wall paint | Paints the room’s side of all its walls. | ||
| Reset label position (Label) | Shown only when you moved the label by hand. Puts it back in the middle. |
Drag a room’s name and area on the plan to move the label. Double-click it (double-tap on a touch screen) to put it back, or use Reset label position in All properties or the right-click menu.
Room types
Picking a type renames the room ("Bedroom", then "Bedroom 2") only while its name is still generic, such as Room 3. It sets the type’s floor only while the floor is Plain or still the last type’s suggestion. A name or floor you chose stays. Other only records the type.
| Room type | Suggested floor |
|---|---|
| Bedroom, Study, Kids room, Closet, Hallway, Sauna | Wood floor |
| Living room, Dining room | Marble floor |
| Kitchen | Ceramic tile floor |
| Bathroom, WC, Mudroom, Utility, Balcony | Anti-skid tile floor |
| Garage, Cellar, Store | Concrete floor |
| Porch | Wood deck |
| Other | None: No suggestions for this type |
Merge, split or delete rooms
- Merge two rooms: there is no merge command. Select the wall between them and press Del. The space becomes one room and the message says rooms merged.
- Split a room: press W and draw a wall across it from wall to wall. The walls it crosses are split, and the new room gets the next Room number. To split without building a wall, make that wall an invisible divider.
- Delete a room: select it and press Del, or right-click it and choose Delete room. The walls that bound only that room go, with its name and finish; walls shared with a neighbour stay. The message names what went, such as Deleted Bedroom, with Undo. A locked room can’t be deleted.
The room’s right-click menu
| Entry | What it does |
|---|---|
| Rename… | Jumps to the name field. |
| Floor finish › | Picks the floor finish. |
| Room type › | Every type, with the current one ticked. |
| Wall paint › | Paints the room’s walls; Custom colour… opens the properties. |
| Show area label | Ticked while the area shows on the plan. |
| Reset label position | Only for a label you moved. |
| Select room walls | Selects the walls round the room, to change their height or thickness together. |
| Add staircase › | Puts a staircase where you right-clicked. |
| Delete room | Deletes the room as described above. |
On a phone or tablet
Tap Room in the tool dock at the bottom and drag for a rectangle, or tap its corners and tap the first corner to close it. You can also tap Wall and tap corner to corner. Closed loops become rooms with their area.
Questions
Why didn’t my walls become a room?
A room appears only when the walls form a closed loop. Check that the last wall ends on the first corner. A loop under 0.5 m² shows Too small to be a room instead.
Can I type exact sizes?
Yes. With the Room tool on, type the width and length in the Room size box, such as 4, 3.5, and press ↵. For other shapes, type each wall’s length; see Draw walls.
How do I rename a room?
Select it and type the name in the name field on its card, then press ↵. Or right-click it and choose Rename….
How do I merge two rooms into one?
Delete the wall between them: select it and press Del. To keep two rooms on the plan with no wall built between them, make that wall an invisible divider instead.
How do I change a room’s ceiling height?
A room has no ceiling height of its own. It comes from the floor’s Storey height and Slab thickness, or from its walls on the top floor. See Ceiling height.
How do I undo a wall?
Press Backspace while drawing to remove the last corner, or ⌘Z (Ctrl+Z on Windows) after the wall is placed.