Floors, basements and terraces
Updated 8 min readWorks without an account
Add floors in the Floors panel or from the floor menu in the top bar: a new floor above the current one, a copy of a floor, a basement below grade, or a terrace on top. Each floor has its own storey height, slab and type, set in Floor settings….
Add a floor
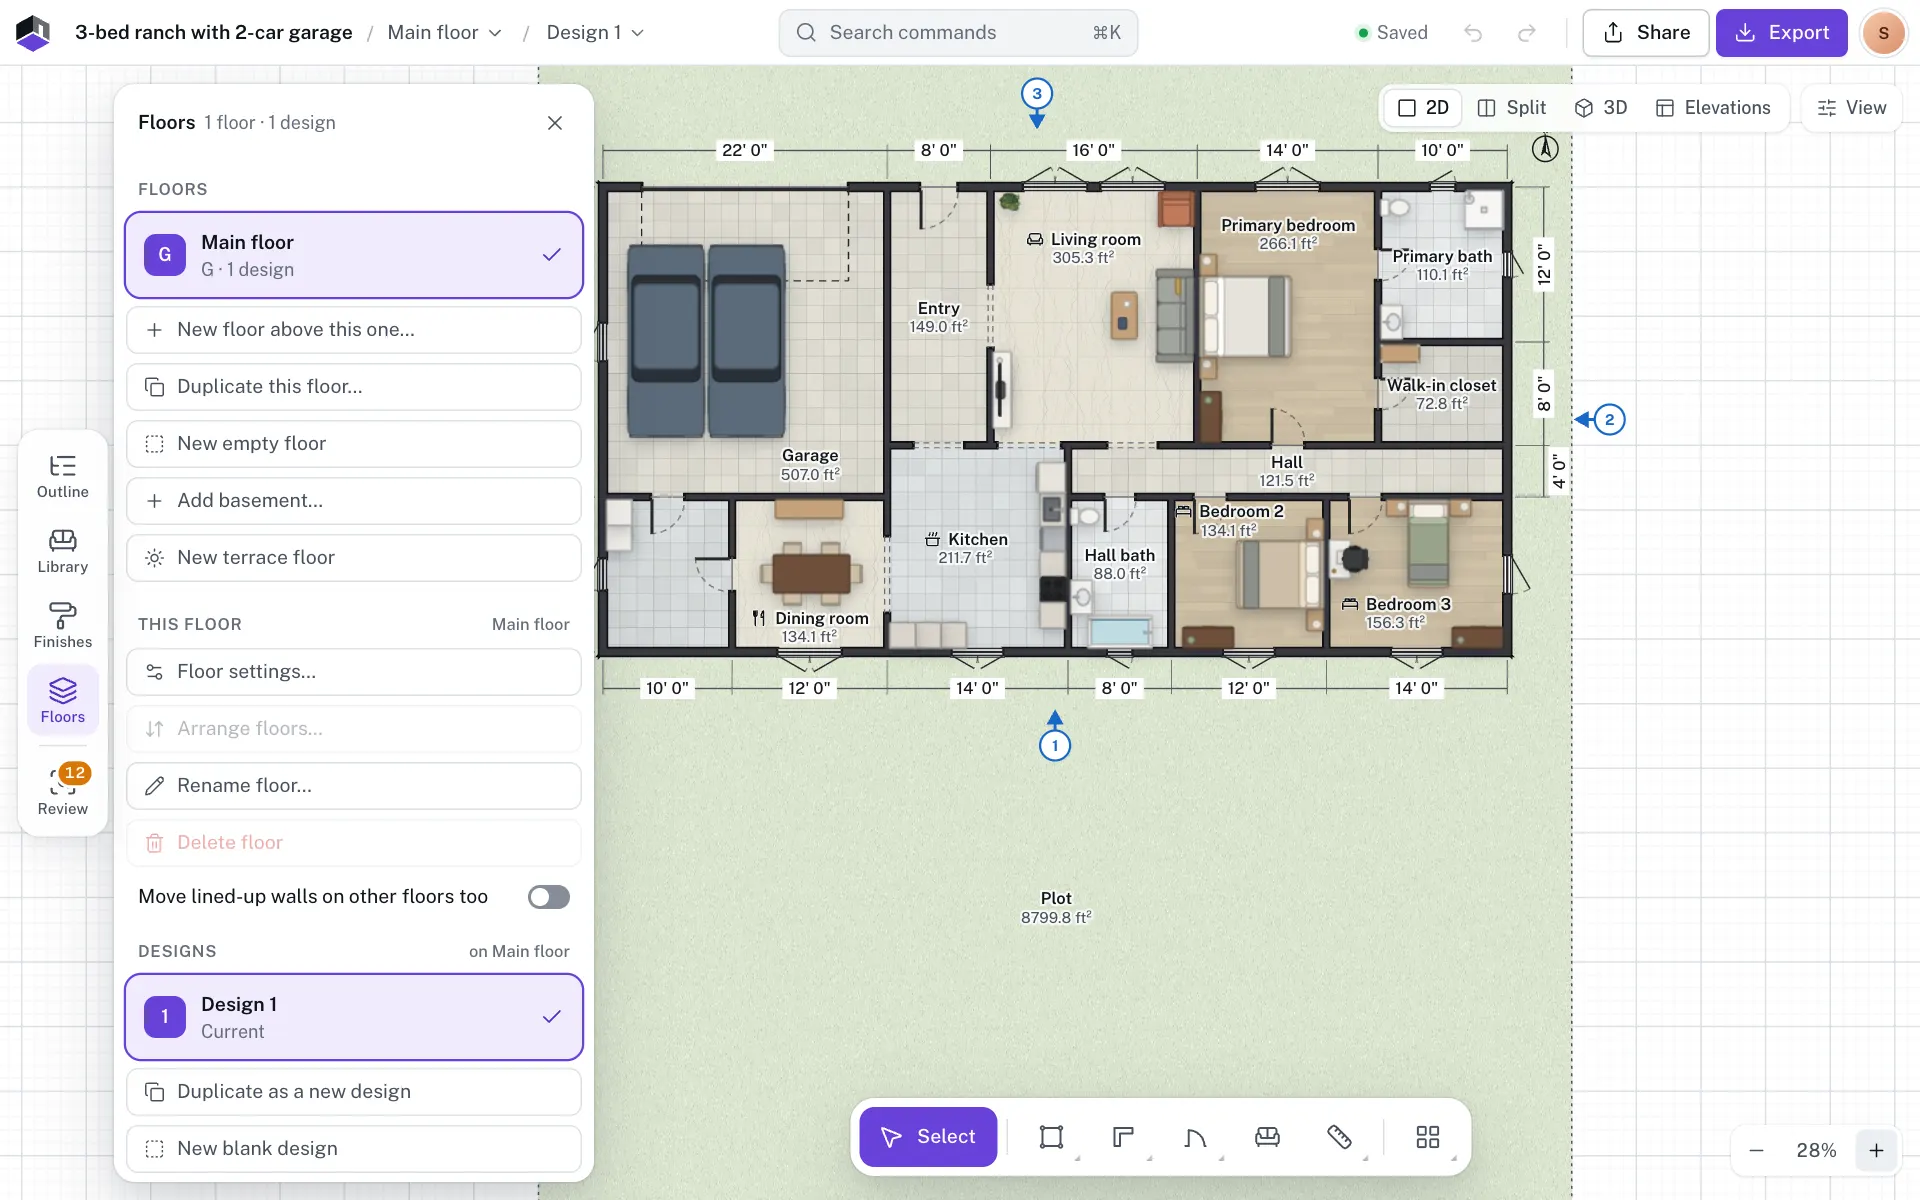
- Step 1: Open the Floors panel
Click Floors on the rail at the left, or press ⌥9. The floor name in the top bar opens the same actions as a menu.
- Step 2: Choose how to add it
New floor above this one… and Duplicate this floor… ask what to copy. New empty floor adds a blank one, Add basement… one below ground and New terrace floor an open roof terrace.
- Step 3: Name it and pick what to copy
Type a Name (up to 200 characters). Under Copy from this floor, turn Walls, Doors and windows, Furniture and fittings, Surfaces and Balconies on or off, then click Add floor or Duplicate. The floors above move up.
- Step 4: Switch floors
Click a floor in the panel, or pick it from the floor menu. Floors are listed highest first, so a basement sits at the bottom.
| Action | Where it goes | Name | Copies | Storey height and slab |
|---|---|---|---|---|
| New floor above this one… | Directly above the open floor | The next free name: First floor, Second floor… | Walls and Doors and windows on; Furniture and fittings, Surfaces and Balconies off | Copied from the open floor |
| Duplicate this floor… | Directly above the open floor | The open floor’s name with “(copy)” | All five parts on | Copied from the open floor |
| New empty floor | Directly above the open floor | The next free name | Nothing | 280 cm and 15 cm |
| Add basement… | Below every floor | Basement, then Basement 2… | Your choice under Start from and the lowest floor’s name, such as Start from Ground floor | Clear height plus a 15 cm slab |
| New terrace floor | On top of the top floor | Terrace | A parapet, plus stair-heads, a water tank and solar panels where they apply and fit | 280 cm and 15 cm |
Doors and windows greys out while Walls is off, since a door needs its wall. Room names and finishes come with the walls. Stairs, lifts, measurements, notes, the north arrow and a traced image always stay on their own floor.
On an upper floor, the walls of the floor below show as a faint dashed outline and new walls snap to it. Turn it off with Floor below, faintly in View options. With Move lined-up walls on other floors too ticked, moving a wall also moves the walls lined up with it on the other floors.
Add a basement
- Step 5: Open Add a basement
Choose Add basement… in the Floors panel or the floor menu. The basement goes below grade under every floor; the ground floor and the floors above keep their levels.
- Step 6: Name it
Name starts as Basement, or Basement 2 when there is one already.
- Step 7: Choose where it starts
Under Start from and the lowest floor’s name, pick Outline (the lowest floor’s outside walls, with the inside open), All walls, or Empty. With walls, the outside ones become concrete foundation walls.
- Step 8: Set the heights
Set the Clear height, from the floor to the underside of the floor above, and the Foundation wall thickness. Then click Add basement.
| Field | What it does | Range | Default |
|---|---|---|---|
| Clear height | Floor to the underside of the floor above. The storey height is this plus a 15 cm slab, and the hint shows it. Habitable rooms need 7 ft under the IRC. | 150–600 cm | US and Canada: 8 ft (243.8 cm). Elsewhere: the region’s wall height, such as 260 cm |
| Foundation wall thickness | Thickness of the concrete outside walls. Hidden when you start from Empty. | 5–100 cm | US: 8 in (20.3 cm). Canada: 20 cm. Elsewhere: 25 cm |
Add a terrace
New terrace floor puts an open slab over the top floor with a 1 m parapet round its edge, a stair-head room round each stair that arrives on it, a water tank and up to four solar panels. The top floor needs at least one closed room first, and it can’t already be a terrace. Press ⌘Z to take it back.
Floor settings
Open the This floor group in the Floors panel and click Floor settings…, or choose Floor settings… from the floor menu in the top bar. The dialog is titled with the floor’s name, for example Ground floor: floor settings. Changes apply as you make them; click Done to close it. Lengths show in the project’s units; the ranges below are in cm.
| Field | What it does | Range | Default |
|---|---|---|---|
| Type | Basement, Stilt (parking), Ground, Upper floor or Terrace. Sets the floor’s level code and how new floors are named. A type that would put a basement above a storey shows as, for example, Basement (not here) and can’t be picked. | The five types | From the floor’s place: the lowest storey is Ground, the ones above Upper floor |
| Storey height | Floor to floor, slab included. It stacks the floors in 3D, sets the rise of a stair that climbs to the floor above, and is the tallest a wall on this floor can be. | 100–2000 cm | 280 cm |
| Slab thickness | The floor structure above this storey. The hint shows the clear height, the storey height less the slab, once you press ↵ or leave the field. Stair headroom checks use the clear height. | 0–200 cm | 15 cm |
| Plinth height (whole house) | How far the ground floor stands above the plot. It is one value for the whole project: it lifts every floor that is not a basement, and basements keep their depth. | 0–1000 cm | 0 cm |
| Add entrance steps | Shown on the ground floor once the plinth is above 0. Puts the suggested steps in front of the house for you to move to the door. |
With a plinth set, a line suggests the steps it needs: the fewest equal risers of at most 17.5 cm, with treads of 30 cm, for example Suggested entrance: 3 steps of 15 cm rise, 2 treads of 30 cm (60 cm run). for a 45 cm plinth. After you add them, the button reads Entrance steps added. If the floor has no walls yet, FloorGen says Draw the walls of this floor first.
The floor’s name is not in this dialog. Use Rename floor… under This floor. Arrange floors… and Delete floor are there too; both are greyed out while the project has only one floor, since a project always keeps at least one.
Make a floor taller
- Step 9: Raise the storey height
Change Storey height in Floor settings…. The same field is in the Project settings panel (⌥1, or Project details in the account menu) and in the plan summary, which opens from the chip at the top left. All three change the open floor.
- Step 10: Raise the walls
Raising the storey height does not raise the walls already drawn; each wall keeps its own Height. Select a wall and type its Height on the card, or select several walls, for example with ⌘A, and set Height in All properties (↵). A wall can’t be taller than its storey.
- Step 11: Set the height of new walls
New walls take Wall height from Settings… › Drawing. Raise it too if you will draw more walls. See The Settings dialog.
For how storey height, wall height, clear height, window sills, item elevations and the plinth fit together, see Heights and levels.
How floor levels are worked out
- There is no level or elevation field on a floor. FloorGen stacks the floors by their storey heights.
- The lowest floor that is not a basement sits at level 0, plus the plinth. Each floor above starts where the one below it ends: its level plus its storey height.
- Basements stack downwards. Each basement’s floor is its own storey height below the floor above it, and the plinth does not move them.
- To raise a floor, raise the storey height of a floor below it or the plinth. To change the order, use Arrange floors….
| Code | Floor |
|---|---|
| B1, B2… | Basements, with B1 the one nearest the ground |
| G | The ground floor, the lowest floor that is not a basement |
| S | The lowest floor that is not a basement, when its type is Stilt (parking). The floors above it are then S+1, S+2… |
| G+1, G+2… | The floors above the ground floor, not counting terraces |
| Terrace | A floor of type Terrace |
Each floor card in the Floors panel shows its code and how many designs it holds, for example G+1 · 2 designs.
Arrange floors
Arrange floors… lists every floor, highest first, with its level code. Drag a row by its grip, or use the up and down arrows beside it. Basements stay below the storeys, so an arrow is greyed out where a move would put a basement above one. Click Done when you are finished.
Questions
How do I increase the ceiling height?
Raise Storey height in Floor settings…, then select the walls and raise their Height. The walls do not follow the storey on their own. See Heights and levels.
How do I set the elevation of a floor?
There is no field for it. A floor’s level is the sum of the storey heights below it, plus the plinth. Change those to move it.
Why can’t I pick Basement for this floor?
Basements must be the lowest floors. A type that would put a basement above a storey is marked (not here). Use Add basement… to add one at the bottom.
Can I undo deleting a floor?
Yes. Press ⌘Z, or Ctrl+Z on Windows. FloorGen also keeps a version from before the delete in Version history….
How do I add stairs between floors?
Place a stair on the lower floor; it rises to the floor above and cuts its opening there. See Stairs and lifts.
Can a floor have more than one layout?
Yes. Each floor can hold several designs. See Designs and scenarios.