Tour of the editor
Updated 4 min readWorks without an account
The plan fills the window and the controls float over it: a slim top bar, the plan summary at the top left, the views at the top right, panels on the left, the tool dock at the bottom and zoom at the bottom right. Anything you can’t find is in the command palette (⌘K).
Around the screen
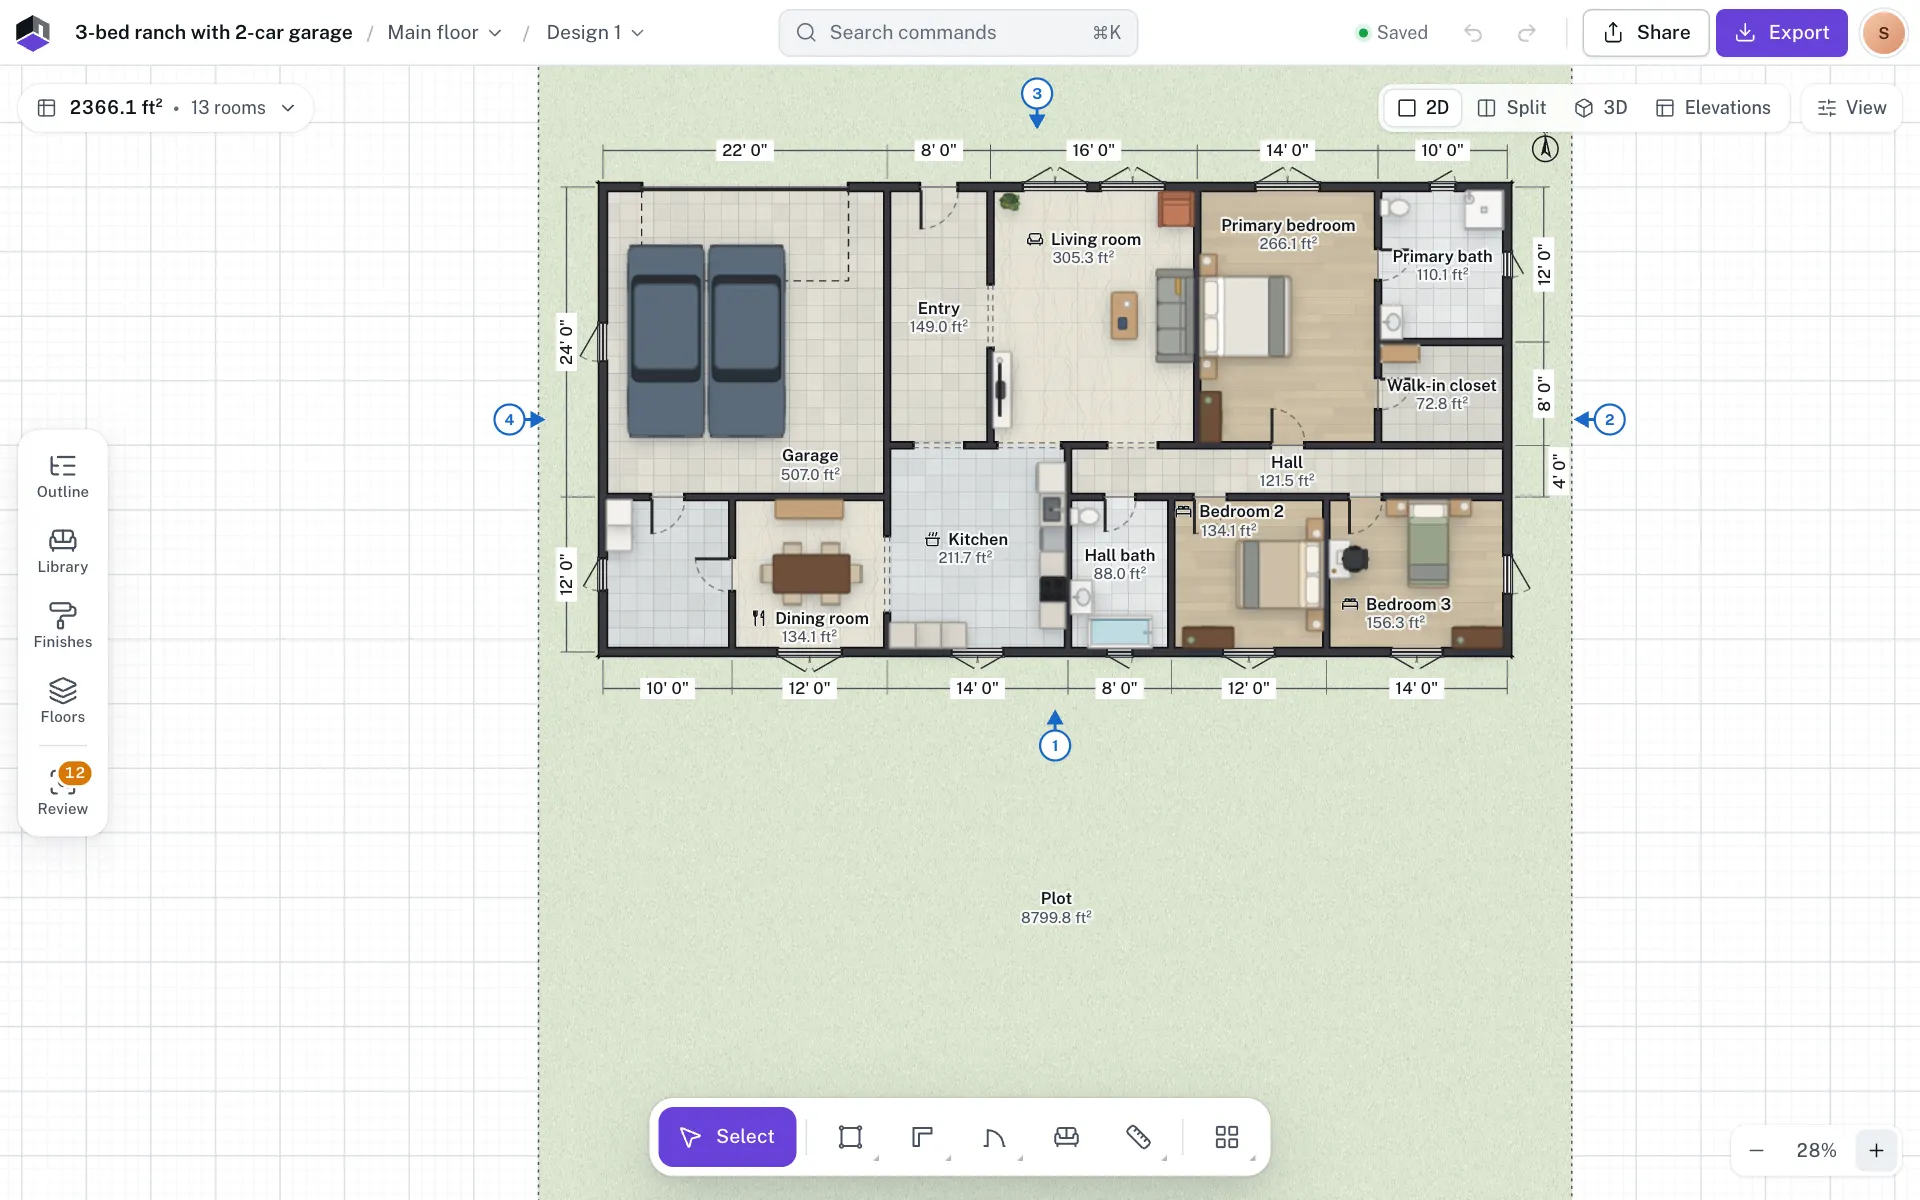
- Step 1: Back to your projects
The FloorGen mark at the top left goes back to All projects.
- Step 2: The project name
Click the name to rename the project.
- Step 3: Floor and design
The floor and design menus switch floors and designs and add new ones. See Floors, basements and terraces.
- Step 4: Search commands
Click Search commands or press ⌘K to find any action, tool, room or object by name. See The command palette.
- Step 5: Save state, Undo and Redo
On screens 1280 px and wider the bar shows Saving… or Saved; narrower, a dot shows it, amber while saving and green once saved. Right-click Undo, or search for History…, to jump back several steps at once.
- Step 6: Share
Share invites people to view or edit the project. See Share a project.
- Step 7: Export
Export (⌥6) downloads the plan as an image, a PDF print set, CAD or 3D files, a view-only page or a project file.
- Step 8: The account menu
Your avatar opens Settings…, Project details, Version history…, Activity, Schedules and budget, Help & shortcuts, Quick start, Theme, All projects, New project… and, when you are signed in, Sign out. As a guest it also offers Sign in or create a free account…, and on a phone it holds Share, Plan summary and View options too. A dot on the avatar means agents made edits you haven’t seen yet.
- Step 9: Switch the view
Show the 2D plan, Split (plan and 3D side by side), 3D or Elevations. Press 2, 3 or 4 to switch, and ` to cycle through 2D, Split and 3D.
- Step 10: View options
View opens snap, the grid, wall dimensions, rulers, units, plan style and theme. See View options and plan styles.
- Step 11: The plan summary
The chip at the top left adds up the rooms, for example 2366.1 ft² · 13 rooms. Click it for the room table, the floor’s Storey height, the building summary, sections, elevations and surfaces.
- Step 12: Panels on the left
The rail opens one panel at a time: Outline, Library, Finishes, Floors and Review. Press its button again, or Esc, to close it.
- Step 13: The tool dock
Select, Room, Wall, Door & window, Furniture, Measure and More tools sit at the bottom centre. Room, Wall, Door & window and Measure open their options above the dock.
- Step 14: Zoom
Use − and + or pick a zoom level. Zoom to fit (or 0) frames the whole plan.
Panel keys
| Panel | What it holds | Key |
|---|---|---|
| Outline | Everything on the floor, by room, with a filter and a Show menu to hide or lock kinds of object | ⌥8 |
| Library | Furniture, fixtures and fittings to drag onto the plan | L or ⌥4 |
| Finishes | Floor finishes, wall paint and materials | ⌥5 |
| Floors | Floors, designs and whole-house scenarios | ⌥9 |
| Review | Building problems by room, numbered on the plan | ⇧I |
| Project settings | Name, units, precision, floor and design, storey height. Not on the rail; open it with its key or ⌘K | ⌥1 |
| Help | Getting started, keyboard shortcuts, the Quick-start checklist and handy keys. Not on the rail | ⌥7 |
Project settings and Project details
Project settings (⌥1) holds the Project name, Units, Precision, a Floor and design switcher with the open floor’s Storey height, and New project, All projects and Version history. See The Settings dialog for each field.
| Section | What it holds |
|---|---|
| Surfaces | Each terrace, path, cutout or balcony on the floor, with the total area. Shown when the floor has any. |
| Staircases | Each stair with its type and number of steps. Click one to select it; ⇧-click adds it to the selection, or takes it out. Shown when the floor has a stair. |
| Lifts | Each lift serving the floor, with its capacity. Click one to select it; ⇧-click adds it to the selection, or takes it out. Shown when there is one. |
| Dimensions and measurements | Show wall dimensions, Measure to (Centre, Inside or Outside), Tape measure (M) and each pinned measurement with its length. |
| Notes and north | North arrow, North points and Print notes and north arrow. See Measure and annotate. |
The Help panel
Press ⌥7, or choose Help & shortcuts › Help panel in the account menu. Getting started opens 11 steps, from drawing rooms to keeping your work, Keyboard shortcuts (?) the full list, and Quick-start checklist shows how many steps are done and brings the checklist card back. Handy keys lists the keys worth knowing. On a phone the checklist steps are listed in the panel instead.
When something is selected
A small bar of quick actions sits above the selection (rotate, duplicate, delete and more), and a card beside it shows its main sizes. All properties at the foot of the card, or ↵, opens every setting in a sheet on the right. Right-click shows the same actions. See Select and edit.
Questions
Where did the menus go?
Every menu item is in the command palette. Press ⌘K, or Ctrl+K on Windows, and type what you want.
How do I see all the keyboard shortcuts?
Press ? in the editor. See Keyboard shortcuts.
Where are the settings?
In the account menu under Settings…, or press ⌘,, or Ctrl+, on Windows. See The Settings dialog.