Select and edit
Updated 9 min readWorks without an account
Click anything on the plan to select it. A card beside it holds the few fields that kind of object needs, a pill above it holds quick actions, and All properties opens every setting.
Select and change one object
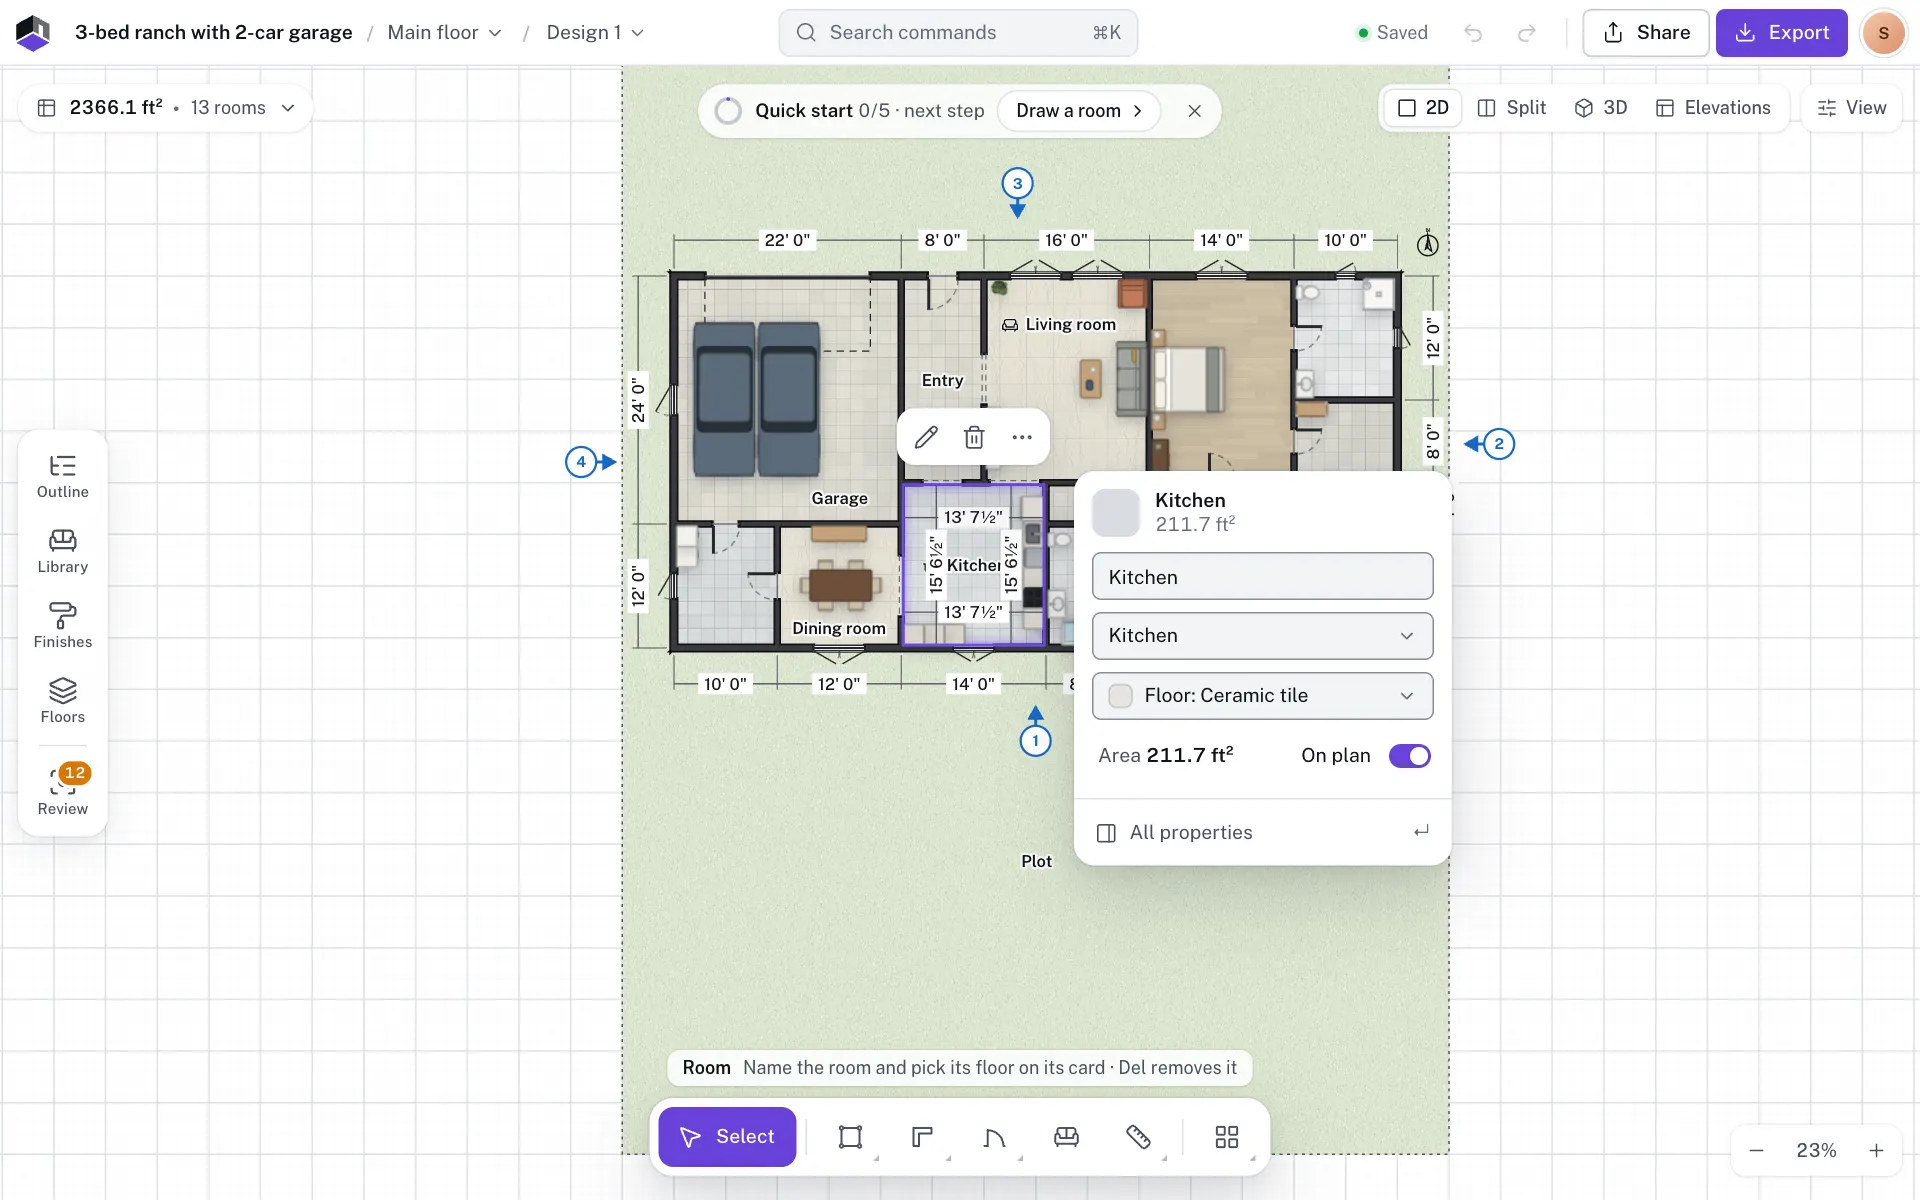
- Step 1: Click to select
Press V for Select, then click a wall, room, door or piece of furniture. With the plan focused, ] and [ step through the rooms, furniture, doors and windows, and walls.
- Step 2: Use the card
The card shows what that kind needs: a room’s name, type, floor finish and area; a wall’s length, thickness and height; a door’s width, height and type, plus the sill for a window; an item’s size, rotation and elevation.
- Step 3: Open All properties
Click All properties at the bottom of the card, or press ↵. The sheet opens on the right; Esc goes back to the card.
- Step 4: Use the pill
The pill above the selection has its main action (rotate an item, split a wall, flip a door, rename a room), duplicate, delete and More actions, the same list you get on right-click. With the focus in the pill, ← and → (or Home and End) move between its buttons.
Lengths show in the project’s units; the ranges below are given in centimetres. The pill and card step aside while a drawing tool is picked, while you drag or drop from the library, and while the right-click menu is open. All properties takes the card’s place; the pill stays.
Select several
| Do this | To select |
|---|---|
| Drag on empty space with a mouse or trackpad | A selection box: everything inside it (drag left to right) or everything it touches (drag right to left) |
| ⌘ drag | A selection box that can start on an object |
| Hold ⇧ or ⌥ while you drag a box | Add what the box picks, or take it away |
| Esc while dragging a box | Cancels the box and keeps the selection you had |
| ⇧ click or ⌘ click | Add a wall, door, window, furniture item, stair, lift or note to the selection, or take it out |
| ⌘A or right-click empty space › Select all | Everything on the floor except hidden objects |
| Right-click empty space › Select by type | All windows, All doors, All walls or Exterior walls |
| Right-click a wall | Select connected walls or Select this wall run |
| Right-click a room | Select room walls |
| Right-click a door or window | Select all doors or Select all windows |
| ⇧ click or ⌘ click rows in the Outline | Walls, openings, furniture, stairs and surfaces. See Layers and the Outline. |
- A room, surface, railing or measurement can’t be added with a click: a ⇧ click on a room selects only the room. A box picks up surfaces, railings and measurements too.
- Boxes and clicks skip locked and hidden objects. Select all includes locked ones, but they don’t move.
- If Scroll wheel is set to Zoom, a plain drag on empty space pans instead, and ⌘ drag draws the box. See Move around the plan. On a touch screen a finger drag on empty space pans; see On a phone or tablet.
Edit several at once
With several objects selected, press ↵ or click All properties. The header counts what you selected, and Select only has a button per kind (such as 3 doors) to keep only those. The fields below edit every selected object of that kind together.
| Section | Fields | Range |
|---|---|---|
| Walls (n) | Thickness (solid walls only, not invisible dividers) and Height | Thickness 2 to 200 cm; Height 30 cm up to the floor’s storey height |
| Doors and windows (n) | Width, Height and Sill height | Width 30 to 1,000 cm; Height 30 to 600 cm; Sill height 0 to 600 cm |
| Objects (n) | Width, Depth, Height and Elevation of the furniture | Width and Depth 1 to 2,000 cm; Height 1 to 1,000 cm; Elevation 0 to 1,000 cm |
- A field whose values differ shows Mixed. Type a value to set it on all of them in one undo step.
- Locked objects are left alone, and so is a door or window that has no room on its wall for the new width. A message says how many, such as Left alone: 2 locked.
- Doors and windows on a selected wall aren’t counted separately. To size openings, select them with Select by type or ⇧ click.
- To raise or lower walls on a whole floor, also see Heights and levels.
Move, turn and line up a group
- Drag any selected object to move them all; the arrow keys nudge the group. A room whose walls are all selected moves with them. Locked members stay where they are.
- Rotate 90° in All properties (tooltip Rotate the group 90°) and R turn the whole group; ⇧R turns it the other way. Right-click › Rotate has Rotate 90° left, Rotate 90° right and Rotate 180°.
- With two or more furniture items in the selection, right-click (or More actions) has Align and Distribute. They move only the furniture, in one undo step. Align has Align left, Align centres horizontally, Align right, Align top, Align centres vertically and Align bottom. Distribute horizontally and Distribute vertically need three items (Select at least 3 items). If nothing needs to move you see Already aligned or Already evenly spaced.
- A group with furniture can be kept for later with Save as furniture pack.
Move, copy and delete
| Keys | Action |
|---|---|
| ← ↑ → ↓ | Nudge 1 cm (⇧ for 10 cm) |
| ⌥ drag | Drag without snapping |
| ⌘D | Duplicate |
| ⌘C, ⌘X | Copy, cut |
| ⌘V | Paste |
| R / ⇧R | Rotate an item, stair, lift or group 90° |
| Del or Backspace | Delete |
| Esc | Deselect |
- Nudge. A door or window slides along its wall; arrows across the wall do nothing. A run of nudges is one undo step. A locked object doesn’t move.
- Duplicate puts a copy beside the original and selects it. A door or window’s menu calls it Duplicate along wall. A room or the traced image can’t be duplicated; to copy a room, select its walls (right-click › Select room walls) and duplicate those.
- Paste (⌘V) puts the copy 30 cm right and 30 cm down from the original, and each further paste steps another 30 cm. A copy that holds walls lands to the right of them, 1 m clear. Right-click empty space › Paste here drops it where you clicked. Until you copy something, Paste here and Paste in the command palette show Nothing copied, and ⌘V does nothing.
- The clipboard survives switching floors and designs, and other FloorGen tabs share it, so you can paste into another project.
- A pasted door or window with no room beside its original rides on the pointer: click any wall to place it, or press Esc.
- Delete shows a message with Undo that names what went, such as Deleted wall with 2 openings · 1 room opened. A wall takes its doors and windows with it. A group loses only its unlocked members; a single locked object stays, with Locked: unlock it in Outline to change it.
For an exact spot, All properties › Position has the X and Y position and Rotation; a wall has End points instead. For one item, stair or lift, right-click › Rotate also has preset angles and Custom angle….
The menu on empty space
Right-click empty space on the plan, with the Select tool, for this menu:
| Entry | What it does |
|---|---|
| Paste here (⌘V) | Pastes the clipboard where you clicked |
| Select all (⌘A) | Selects everything that isn’t hidden; greyed out with Nothing on the plan when the floor has no walls or furniture |
| Select by type | All windows, All doors, All walls or Exterior walls |
| Add | Picks a drawing tool: Room (R), Wall (W), Surface (U), Railing (E), Kitchen run (J), Door (D), Window (N), Section line (X) or Tape measure (M) |
| Add staircase | Every stair type, placed where you clicked. See Stairs and lifts. |
| Zoom to fit (0) | Fits the plan in the window |
| Snap to grid, Show grid, Show dimensions | Switches; the menu stays open so you can change several |
| Plan style | Materials, Coloured outline, Black and white or Blueprint |
| Undo (⌘Z), Redo (⇧⌘Z) | Greyed out with Nothing to undo or Nothing to redo |
Move around the plan
- Hold Space and drag, or drag with the middle mouse button.
- Drag inside a room, on its floor away from its name and walls. The room is selected and the plan pans; it doesn’t move the room.
- Pick the Pan tool (H, or More tools › Pan) and drag anywhere.
- Scroll with two fingers on a trackpad. A mouse wheel zooms at the pointer; ⇧ plus the wheel pans sideways, and ⌘ plus the wheel (or a pinch) always zooms.
- While you draw or drag, move the pointer to the edge of the plan and it scrolls.
- The zoom level at the bottom right opens a menu of 25%, 50%, 100%, 200% and 400% and Zoom to fit (0). Each click of the + button zooms in 1.25 times and - zooms back out by the same step. The plan zooms from 5% to 800%.
Scroll wheel in View options, in Settings and in the ? dialog picks what scrolling does: Auto (trackpad pans, mouse zooms; the default), Pan (pinch to zoom) or Zoom (Shift-scroll pans). With Zoom, a plain drag on empty space pans.
Undo and Esc
Press ⌘Z to undo and ⇧⌘Z to redo; the Undo and Redo buttons name the step in their tooltip. Right-click Undo, or search History… in the command palette, to jump back to any step.
Each press of Esc closes one thing, innermost first: the plan summary or View options, then All properties, then the selection, then the open panel. With a drawing tool picked and nothing being drawn, Esc goes back to Select.
On a phone or tablet
Tap to select and drag to move. Long-press anything for more actions, such as duplicate and delete. To select an area, long-press empty space and drag a box without lifting your finger.
Questions
Why can’t I select or move this object?
It is locked. A click on a locked object acts like a click on empty space, so its card never opens from the plan. Select it in the Outline, with ⌘K, or with ] and [, then click Unlock on its card. See Locked objects.
How do I make many walls taller at once?
Right-click empty space › Select by type › All walls (or ⇧ click the walls you want), press ↵, and type the new Height under Walls. See Heights and levels.
How do I change many doors at once?
Right-click empty space, choose Select by type › All doors, then press ↵ and type the new Width in All properties. It sets every door in one step.
Can I copy furniture into another project?
Yes. Copy it with ⌘C, open the other project (in this tab or another), and press ⌘V or right-click › Paste here.
Is ⌘ the Ctrl key on Windows?
Yes. ⌘ is Ctrl and ⌥ is Alt on Windows and Linux.