Stairs and lifts
Updated 12 min readWorks without an account
Stairs and lifts are in More tools in the tool dock. Pick a preset to add it in the middle of the view, or drag it onto the plan, then set its steps, size and floors in its properties.
Add a staircase
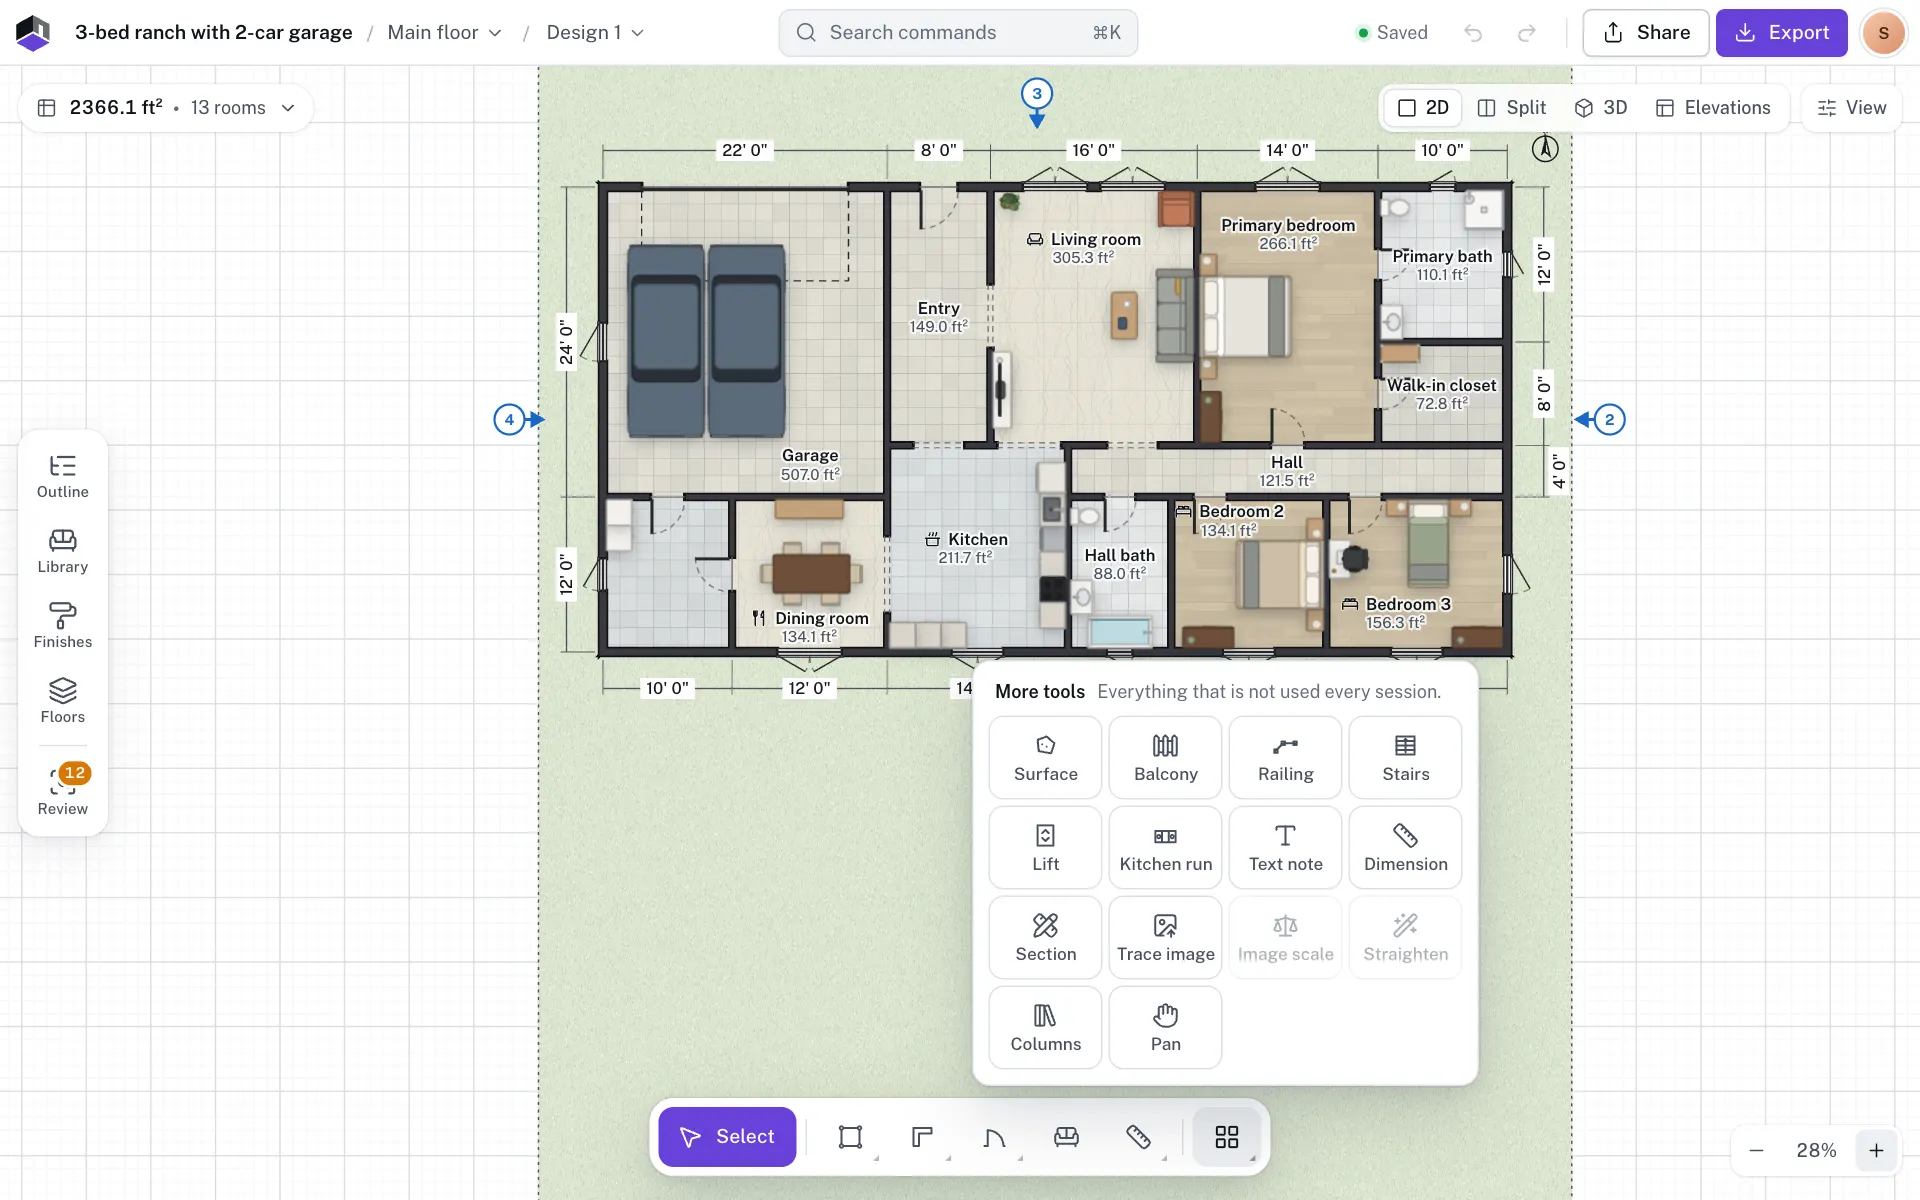
- Step 1: Open More tools
Click More tools at the right end of the tool dock.
- Step 2: Pick Stairs
Stairs opens the list of staircases, starting with Stair core (multi-storey). Lift opens the lift presets.
- Step 3: Place it
Click a preset to add it in the middle of the view, or drag it onto the plan. Press R to turn it 90° (⇧R the other way).
- Step 4: Stand it against a wall
In the stair’s properties, click Align to wall, then click a wall. The stair climbs along that wall, 2 cm off its face. Flip direction turns it round.
- Step 5: Resize it
Drag the handles on the plan to resize or rotate it. A dragged edge snaps flush to a wall face. Press ↵ for All properties.
- Right-click an empty part of the plan, or a room, and choose Add staircase › a preset to put it where you right-clicked.
- The side handles change Width (40–400 cm). The end handles change Tread depth (15–45 cm; 5–40 cm for alternating tread, ladder and attic ladder), a ramp’s Length or a curved stair’s Inner radius. On a spiral, the corner handles scale the radius. The number of steps never changes, so the risers stay as they are.
- Hold ⌥ while you drag a handle to resize without snapping to walls. The rotate handle snaps to 45° steps and to the angle of walls nearby.
- On the plan a stair shows its treads, rails, a zigzag break line at 1.2 m with the treads above it dashed, and an arrow labelled UP. On the floor above it shows as its opening: a dashed outline with the upper treads and a DN arrow.
| Group | Types |
|---|---|
| Straight | Straight, Straight with landing, Flared bottom steps, Floating, Ramp |
| Turning | L-shaped (landing or winders), U-shaped (landing or winders), Double winder, Z-shaped, Three-quarter turn, Imperial (split) |
| Spiral & curved | Spiral, Square spiral, Curved, Helical |
| Compact | Alternating tread, Ladder, Attic ladder |
| Multi-storey | Switchback (dog-leg), Scissor, Fire escape |
Stair properties
Select a stair and press ↵ for All properties. A field appears only for the types it applies to. Lengths show in the project’s units; this guide gives them in cm. For how the rise relates to the storey and the slab, see Heights and levels.
| Field | What it does | Range | Default |
|---|---|---|---|
| Width | How wide the flight is. | 40–400 cm | 90 cm (110 switchback and scissor, 100 curved and helical, 80 imperial, 65 alternating, 60 attic, 50 ladder, 120 ramp) |
| Steps (risers) | How many risers the stair has. Change it to change the riser height. | 2–60 | 16 (13 spiral, 14 square spiral and alternating, 17 three-quarter, 18 helical, 11 ladder and attic) |
| Riser height | Read only: Total rise ÷ Steps (risers), to the millimetre in metric plans. You can’t type it. | 17.5 cm on a 280 cm storey | |
| Tread depth | How deep each tread is. The end handles keep it to 15–45 cm (5–40 cm on alternating tread, ladder and attic ladder). | 5–60 cm | 28 cm (20 alternating, 13 attic, 10 ladder) |
| Going (walking line) | Read only, in place of Tread depth on spiral, square spiral, curved and helical stairs. The radius and sweep set it. | ||
| Length | Ramp only, in place of steps and treads: how long the slope is. | 50–5000 cm | 600 cm |
| Total rise | How high the stair climbs. While Match floor height is on it is read only and says Follows the storey height of this floor, or Follows each floor’s storey height on a stair core. | 20–1000 cm | The storey height (50 cm for a ramp) |
| Match floor height | Keeps the total rise equal to the storey height. Turn it off to type your own rise. On a stair core the switch is hidden, and Continue to all floors above turns it on. | On or off | On (off for a ramp) |
| Field | What it does | Range | Default |
|---|---|---|---|
| Turns while going up | Left or Right, for L, U, double winder, Z, spiral, square spiral, curved, helical, three-quarter, switchback, scissor and fire escape stairs. | Left, Right | Left |
| Landing depth | Straight with landing, L and U with landing, Z, switchback, imperial and fire escape stairs. On an attic ladder the same field is Hatch length. | 40–600 cm | 90 cm (120 switchback, 110 imperial, 100 fire escape; hatch 110) |
| Well gap | The gap between the flights of a switchback, imperial or fire escape stair. On a scissor stair it is Spine wall. | 0–200 cm | 10 cm (12 switchback; spine wall 20) |
| Winders per turn | L and U with winders, and double winder. | 2–6 | 3 |
| Flared steps | Flared bottom steps: how many steps flare out. | 1–4 | 2 |
| Radius | Spiral. Half width on a square spiral, Inner radius on curved and helical stairs. | 40–600 cm | 80 cm (90 square spiral, 150 curved, 45 helical) |
| Sweep | How far round a spiral, square spiral, curved or helical stair turns. | 30–720° | 360° (120° curved, 300° helical) |
| Centre pole | Spiral and square spiral only. | On or off | On |
| Field | What it does | Range | Default |
|---|---|---|---|
| Open risers | Leaves the gaps between treads open. Not offered on ramps, alternating tread, ladder, attic ladder, floating or fire escape stairs. | On or off | Off (on for spiral and square spiral) |
| Stringers | The boards along the sides of the flight. Not offered on the same types. | On or off | On (off for spiral and square spiral) |
| Left handrail, Right handrail | Rails on each side, looking up the stair. | On or off | Right only on straight, straight with landing, L, spiral, square spiral and floating; none on ladder and attic ladder; both on the rest |
| Rail height | Shown while at least one handrail is on. | 60–120 cm | 90 cm |
| Material | Wood, Concrete, Steel or Stone. Picking one also sets its colour. | 4 materials | Wood (steel for spiral, alternating, fire escape and the stair core; concrete for ramp, switchback, scissor and helical; stone for imperial) |
| Colour | The colour in 3D and in the materials plan style. | Any colour | The material’s colour, or a shade of it on ramp, switchback, scissor, helical, floating, fire escape and the stair core |
| Starts | Under Level: the height of the first step above the storey floor; negative starts below it. | −1000 to 1000 cm | 0 |
| Continue to all floors above | Under Multi-storey: makes it a stair core. Not offered on ramps, ladders and attic ladders. | On or off | Off (on for scissor, fire escape and the stair core) |
| Up to | With the stair core on: Top floor or the last floor it reaches. | Floors above | Top floor |
| Cut an opening in the floor above | Makes a hole over the stair in the floor above, outlined on its plan. | On or off | On (off for a ramp) |
- Position has X, Y and Rotation (−360 to 360°, to 0.1°) and a 90° button. Near a wall the hint says Climbs parallel to a wall at the wall’s angle. A locked stair’s position is read only.
- The Level section appears when the stair stands in a sunken or raised room, or already starts off the floor. It says how far the room is above or below the floor, and Climb to the room level fits the rise to the room.
- With the stair core on, a list shows each floor with its steps and risers, such as
16 × 17.5 cm, a warning icon when the risers there are uncomfortable, and Arrives · guard rail on the last floor. - Select a stair core on a floor above its own and a note says This stair core lives on its floor, with a Go to button. Changes made there apply on every floor.
Change the stair type
Picking another type in the picker at the top of the panel applies that type’s defaults: width, steps, tread, landing, radius, sweep, rails, risers, stringers, material and colour. It keeps the turn direction, the floors it spans and Cut an opening in the floor above. Except when you change to or from a ramp, it also keeps Match floor height, Total rise and Starts.
- Changing to Scissor or Fire escape turns the stair core on.
- Changing to Ramp turns off Match floor height and Cut an opening in the floor above, with a 50 cm rise. Changing a ramp back to a stair leaves Cut an opening in the floor above off.
Comfort checks
Comfort at the bottom of the panel says Comfortable: 2R + T = the step value, or lists what is wrong. The limits follow the project’s building code profile. With the generic rules, risers of 15–19 cm, treads of 25–30 cm, 80 cm of width and 2 m of headroom are comfortable.
- Steep or shallow risers, short or long treads, and a pitch steeper than the code allows.
- The step formula 2R + T outside 60–66 cm; aim for about 63 cm.
- A narrow stair, a narrow spiral (treads under 60 cm long) and a handrail lower than the code asks for.
- An odd number of risers on a switchback, imperial or fire escape stair, and more than 16 risers on a straight, floating, flared or scissor stair.
- No opening in the floor above, or low headroom under the floor or a flight above, with the step where it happens.
- A rise that differs from the storey height, and a ramp steeper than 8.3%. A ramp that isn’t says A gentle ramp.
- Alternating tread, ladder and attic ladder skip the riser, tread and width checks, with a note that the comfort rules don’t apply to steep stairs.
Right-click a stair for Rotate ›, Turn right instead or Turn left instead on turning types, Duplicate, Copy, Cut, Paste here, All properties and Delete. A stair core seen from a floor above can’t be copied there.
Add a lift
Open More tools › Lift and click a preset to add it in the middle of the view, or drag it onto the plan. Drag the handles on the plan to make the shaft smaller or bigger, and press R to turn it.
| Preset | Shaft (clear inside) | Door | Also |
|---|---|---|---|
| Home lift (small) | 110 × 110 cm, 15 cm walls | 80 cm, Single slide | |
| Passenger lift, 8 persons | 160 × 175 cm, 20 cm walls | 90 cm, Telescopic (2-speed) | 630 kg |
| Passenger lift, 13 persons | 200 × 190 cm, 20 cm walls | 100 cm, Centre-opening | 1000 kg |
| Bed / stretcher lift | 180 × 280 cm, 20 cm walls | 120 cm, Telescopic (2-speed) | Deep cabin |
| Panoramic glass lift | 160 × 160 cm, 10 cm glass walls | 90 cm, Centre-opening | Panoramic (all glass) cabin |
| Goods lift | 200 × 250 cm, 25 cm walls | 150 cm, Centre-opening | Through cabin; needs a machine room |
| Field | What it does | Range | Default |
|---|---|---|---|
| Preset | Under Shaft: applies a preset’s sizes, doors and build. Position and floors stay. It keeps naming the preset you placed after you change the sizes. | 6 presets | The one you placed |
| Shaft width, Shaft depth | The clear inside size of the shaft. | 80–600 cm | From the preset |
| Wall thickness | How thick the shaft walls are. | 5–60 cm | 20 cm (15 home, 10 panoramic, 25 goods) |
| Shaft walls | Solid or Glass. | 2 choices | Solid (glass for panoramic) |
| Size from the shaft | Under Cabin: works the cabin out from the shaft. Turn it off to type Cabin width and Cabin depth. Capacity comes from the cabin floor area. | Cabin 50 cm up to the shaft less 10 cm | On |
| Door width | Under Doors: the clear width of the lift door. | 60–300 cm | 90 cm (80 home, 100 13-person, 120 bed, 150 goods) |
| Door type | Single slide, Centre-opening or Telescopic (2-speed). | 3 types | From the preset |
| Door side | Front, Right, Back or Left. | 4 sides | Front |
| Door position | A slider that moves the door along its wall, with a Centre button. The hint says where it is, such as 20 cm right of centre (seen from outside). Shown only when the door has room to move. | Up to the shaft wall | Centred |
| Through cabin (doors on two sides) | Adds a second door on the opposite side. | On or off | Off (on for goods) |
| Run up through the floors above | Under Floors served: draws the shaft on every floor it serves and cuts through their floors. Off, the lift stays on its floor. | On or off | On |
| Up to | Top floor or the last floor it serves. The list below labels each floor Pit · first stop, Stop or Top stop (Only stop for one floor). | Floors above | Top floor |
| Cabin style | Under Build: Brushed steel, Glass back wall or Panoramic (all glass). | 3 styles | Brushed steel (panoramic for the glass lift) |
| Machine-room-less | On, the drive sits in the shaft head. Off, the hint says Needs a machine room above the top stop. | On or off | On (off for goods) |
- Checks warns when the cabin is smaller than 110 × 140 cm, the door is narrower than 80 cm, or the door is wider than its shaft wall. Otherwise it says Fits a wheelchair user with a companion.
- Drag the door on the plan to move it along its wall.
- Right-click a lift for Rotate ›, Move door to the next side (front, right, back, left in turn), Door side ›, Lift type ›, Duplicate, Copy, Cut, Paste here, All properties and Delete.
- Select the lift on a floor above its own and a note says This lift starts on its floor, with a Go to button. Changes made there apply on every floor.
Ride a lift in 3D
In Walk mode, step into the cabin. A Lift panel with one button per floor it serves appears, top floor first, with the current floor lit. Click a floor, or press 1 to 9 (1 is the lowest stop) or PgUp and PgDn for the next stop up or down. While it moves the panel says To the floor.
Questions
How do I change the riser height?
Riser height is worked out for you: Total rise ÷ Steps (risers). Add or remove steps, or turn off Match floor height and type a new Total rise.
How do I make a stair turn the other way?
Right-click it and choose Turn right instead or Turn left instead, or pick Left or Right under Turns while going up in All properties.
How do I make a stair go down to a basement?
Place the stair on the basement floor. It rises to the floor above and cuts its opening there.
Why is my stair flagged as uncomfortable?
Its risers are too tall or its treads too short for the 2R + T rule. Add steps or lengthen the treads until Comfort says it is comfortable.
Where else can I find stairs?
The Library’s Structure category has every staircase and lift preset too. The Columns tile in More tools opens it there.